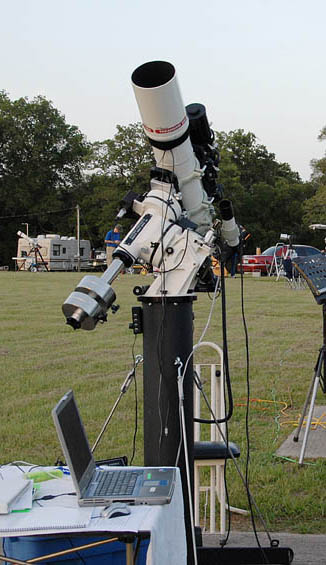
The new mount undergoes a preliminary check-out indoors
The new mount undergoes a preliminary check-out indoors
I believe I am ready to declare victory in my battle to get excellent guiding... At least at focal lengths of 1000mm on an APS sized DSLR chip (1600mm effective focal length as compared with 35mm film). I am now able to use the full resolution of my images without downsizing them to hide guiding errors in my photographs.
Here are a few summarized points for advanced astrophotographers.
-Get reasonably balanced. I went to a piggyback style guide scope arrangement, which is much easier to balance than the side-saddle approach I used with my G11. (The extra capacity of the AP makes this approach less risky than with the G11.)
Polar alignment is important, but maybe not as important as you think. How aligned you need to be is discussed here. Align your guide scope with the center of your image frame if you can.
-Do the test I mention below and convince yourself that the mount guides very well to begin with.
-Guide such that you make corrections every 2 to 4 seconds. Otherwise you will probably be chasing seeing and degrading your results. If you can, guide based on multiple images averaged.
-If you are definitely drifting in a certain direction in DEC, turn off guiding in the other DEC direction. Turn down the aggressiveness in DEC anyway, as your DEC drift should be relatively slow if your alignment is decent.
-If you're still seeing elongated stars, it may be due to your optical train. Make sure your camera is square to the imaging train. Non-round stars may be due to optical issues with your setup; don't automatically blame your mount or your guiding.
-In the "duh" category: If your mount seems to be off in RA, make sure you're guiding at the sidereal rate, not the lunar rate. I believe accidentally hitting the "8" on the keypad can do this to you!
I'm expecting my AP 900GTO mount to help improve my astro-photographs. Now if the weather would only cooperate!
For the astro-geeks that might also be struggling with new AP GOTO mount setup issues, I have collected some information that may be helpful. Polar alignment, pointing accuracy, and a wireless serial link to the scope are among the topics.
10/2007: Major excursion to the Davis Mountains, TX, USA.
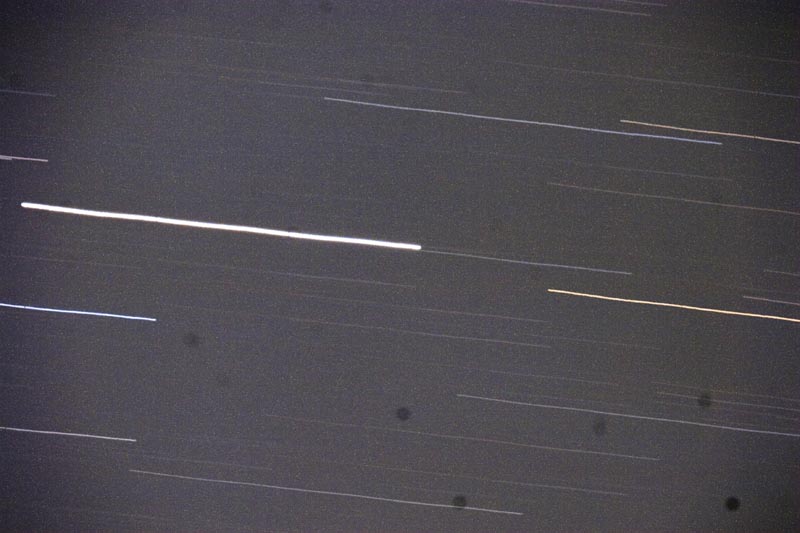
9/2007 Fourth Field Trip. I had some guiding challenges during these September nights, but overall results weren't bad. After seeing some of my shots, I decided to double-check the mount's tracking. I set up at home and took 3 - 4 minute exposures from the back yard during a bright moon. Not ideal, but enough to see the mount is tracking pretty smoothly, and certainly I should be able to guide out any tracking irregularities. I should have done this first: Take a picture of your mount's tracking so you can see what it's doing! You can see the two notches in the star trails as the camera paused for a second or so between the 3 exposures. The worm period is around 7 minutes, so you're seeing about 1.5 rotations of the worm. See guiding tips at the very end of the page.
6/9/2007 Second Field Trip (Shot some globular clusters and tested guiding accuracy):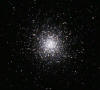
5/9/2007 First Field Trip: See: M101 and
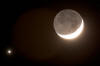
Moon and Venus from the trip.
5/10/2007: Success with a "Bluetooth connection!" between my laptop running The Sky software and the telescope mount. No cords to trip over in the dark!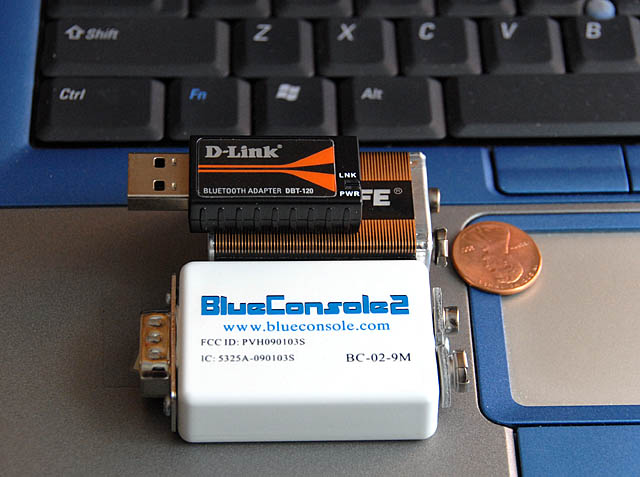
Here's the secret to success: Do not install the drivers that come with DLink's DTB-120 USB to bluetooth adapter. (This is a popular and inexpensive USB->Bluetooth adapter that apparently has at least 4 different hardware versions in the last several years.) If you do install them and are running Windows XP SP2, do what I did and go back to an old restore point. With Windows (it has to be the SP2 version) managing the DBT-120, I can connect The Sky6 wirelessly to the the AP 900GTO mount using a BlueConsole serial adapter connected to the mount's serial port. After getting rid of the drivers in short order I was rocking and rolling, wirelessly controlling the mount using The Sky 6. Thanks to Bill Pellerin of the HAS for the idea in May Guidestar. 11/2007: Trick number 2: Plug in the USB adapter into the same USB port every time, and boot the laptop with the adapter already plugged in. That's the only way it works!
5/9/2007: "Second Light"
The second night was much smoother than the first, and I even took some time to look at Saturn.
I hooked up my laptop to the scope using a serial cable, and used The Sky 6 to connect and control the scope. This was much easier than navigating the hand controller. It allowed me to quickly point to good stars to drift align on, even before it was completely dark! (Beats the heck out of finding them manually when it's still light.)
I drift-aligned the mount using my STV for about 15 minutes, taking notes on which way to turn the knobs. Pointing accuracy within the same general area of the sky was sufficient to get it in the narrow field of view at high power (200x). I would guesstimate it was within a degree or 2 of target when I crossed the meridian, easy to center in the finder, and maybe in a wide-angle EP. So the strategy is to just slew to a bright star in the part of the sky you want to be in, re-synch the mount to that star after you slew, and then you will have good accuracy in that part of the sky.
I am pretty sure it's aligned well enough for the 4 minute DSLR exposures I typically take. (It's hard to be certain of anything when I'm on the wooden porch which can shift a big depending on where I am!) With the sturdier mount I'll probably be taking longer exposures at some point.
I watched the tracking for a few minutes and didn't find anything to complain about. Actually it was too good at first, as somehow my the focal length had changed from cm to inches! If my setup is reading correctly I was averaging plus or minus one arc second guiding using .5 second updates and no PEM/PEC whatever it's called.
I was also hoping to control the scope wirelessly with a D-Link DBT-120 Bluetooth adapter. This was to be connected to a BlueConsole serial adapter plugged into the serial port on the scope. That didn't work.
5/4/2007: "First Light"
I finally had all the pieces of my new mount and pier on 5/3/2007. Did the weather cooperate? No, we experienced severe thunderstorms that night, with numerous tornados being reported by the NWS (including one about 4 miles from our house!). First light took place on the next night in my backyard, under extremely warm and humid conditions with poor transparency (but good enough to see stars!). Note that due to numerous trees and the house, there is a fairly limited view of the sky at my house here in The Woodlands, which makes everything much more challenging. Not to mention the mosquitoes (addressed with "100% DEET" spray)!
My main goal was to get the mount properly polar aligned and to see if I could get accurate "goto" behavior. Results were not great! Before it was dark I did my best to adjust the altitude before starting based on knowledge of where Polaris is in relation to the garage and trees in my backyard. (The Losmandy G11 has marks for altitude so you can get close, but the AP does not.) I started by trying the Two-Star Calibration method, where you tell the mount what it's point at, slew to another object, and adjust the alt/az of the mount to correct polar alignment. Repeat as necessary. Since this involves looking at the finder scope and a cross hair eyepiece while simultaneously trying to adjust alt/az, numerous contortions were required. Adjusting the altitude with a fully load mount also requires considerable effort in turning the knob. (The Losmandy alt knob is much more conveniently placed and easier to turn.) After a while it became clear to me I was not converging on accurate alignment. I was always landing within a few degrees of my target, but I wasn't getting closer. Time for plan B.
Plan B was to get out the polar alignment scope. Being able to sight Polaris through the trees is always dicey at my place, and forget about the 2nd and 3rd stars in the polar alignment scope. There is an additional problem that the supplier apparently changed the polarity on the LED illuminator AP supplies with the polar scope, meaning that the illuminator extension cord can't be used at this time. I'm have spoken with Christine at AP and am waiting for them to provide a solution for this issue. I was able to just barely connect the illuminator and sight Polaris through the trees. It didn't seem I was too far off from being aligned, and I tweaked my alignment as best I could.
Unfortunately, my goto accuracy and didn't seem to have improved after that, and a few more iterations of the "two-star" method didn't seem to be helping. I decided to punt, pack it in, and refer back to the instructions to see what I might be doing wrong, etc.
One possible issue is that the scope is not orthogonal (at right angles) to the mount, but I'm using BT Technologies plates and a Takahashi clamshell and I doubt that is too far off. It turns out the problem is likely with the routine itself and the stars I was choosing.
After further reading, next time out I'm going to hook up my STV and drift align, and then see how accurate my goto's are. If I'm definitely aligned and not hitting my targets I have to assume I have an orthogonality issue. A weakness of the AP controller is that it isn't capable of taking orthogonality issues into account; software like Tpoint does that however.
In a post in the Yahoo ap-gto group, Roland of AP addresses someone with a similar problem, looking for help with Orthogonality. See a number of posts excerpted below, of interest only to extreme astro-geeks and people with the same issues I'm having ;-)
> I had some significant time with my new mount (AP 1200) and the new
> camera this past weekend (finally!). One thing that is more
> challenging than I expected is polar alignment. I did the 'daytime
> polar alignment' routine using a carpenter's level and the Moon. The
> mount/pier were reasonably level as well. Then, when I do the 2-star
> calibration I seem to be 'oscillating' back and forth in azimuth.
There is always some confusion as to what this 2 Star thing is supposed to
do. It is not a calibration routine. It does not calibrate anything in the
mount. It is simply one more of dozens of polar alignment routine options. This one
in particular can be hard to converge, especially if you happen to choose the
wrong two stars. As such, this polar alignment option is probably the weakest
of all. You should never conclude from this alignment routine that something
is amiss with your orthogonality. In fact, I am tempted to eliminate this
routine because of the confusion it seems to cause everyone who first uses this
mount after using other commercial Alt-Az mountings.
The best way to judge the orthogonality of your setup is to GoTo the same
star on both sides of the meridian. {...}
The other thing I want to point out is that with a normal refractor and
normally well machined rings, you will never have any orthogonal errors that are
too large. You should have very close GoTo accuracy if you are properly polar
aligned. {...} Rolando
In another post, Roland notes he does this:
Here's what I do when setting up the scope at a remote site:
1. I place the mount and scope in Park1 position using a simple carpenter level.
2. I start the keypad in Autostart NO and press Resume from Park1
3. I then slew to Park2 and level the tube manually using the carpenter's level.
4. I slew back to Park1 and level the tube using the altitude adjustment. This completes the initial setup of the altitude axis.
5. I slew to a known star (or the sun or bright planet) and adjust the
azimuth to bring it near the center of the finder crosshairs.
This completes the initial setup of the azimuth axis. Both of these
adjustments can be done in the daytime, which allows me to find bright stars in the
telescope at low power for further polar refinement before the sun has set.
When these adjustments are finished, I refine the altitude axis by using a
star near the meridian line and using the meridian delay to pick it up on either
side of the mount. This gets the altitude axis quite close to final position,
and takes less than 5 minutes. When that is done, I do a drift align using my
CCD camera. That can take anywhere from 15 - 25 minutes, depending how fussy
I want to be. Rolando
Additional Tricks in another post from Roland:
One way around this is to use my handy dandy easy method of polar alignment. This involves picking a star within 1 hour or so of the meridian, centering said star on the crosshair, and pressing Rcal. Then you change the meridian swap time by one hour so that when you enter that very same star again on the keypad, the mount will slew the scope to the other side of the mount. Now you will see the star either north or south of the crosshair, and it will be east or west of the crosshair also. If you are perfectly polar aligned
and have no orthogonality problem, then the star will be on the crosshair. In the first iteration, you want to ignore any east to west difference (east to west error is exactly twice the orthogonality error of your scope). Concentrate on getting the North to south error down to zero. You do this by moving the star half way to the crosshair with the buttons, and then adjusting the altitude axis to bring it the rest of the way. Now press Rcal and change the meridian swap time back to zero. Enter the star again and do another slew. This time you will see that the star will be much closer to the crosshair north to south, although east to west error will be the same. Do one or two more iterations, and you should have the altitude axis nailed down dead nuts, where the star will come back to the crosshair line give or take a fraction.
To speed things up, I always use the tour mode, pick stars per constellation, pick alpha, beta or some suitable candidate etc. This way I don't have to scroll thru the stars list each time I want to enter the star again. The button on the lower left will bring up the menu for meridian delay and Rcal, so it is real fast to go between these 3 functions.
What about orthogonality and the azimuth axis? If you stay on one side of the mount, either east or west (now that you have perfect altitude setting), you can slew between 2 stars, one somewhere north and one toward the south in the sky. These two stars can then be used to tweak in your azimuth setting - just be sure to not touch the altitude axis. Once this has been adjusted (it should take only a few iterations), your mount will be very close to polar alignment and should point properly. However, if your scope is not orthogonal, there will be a pointing error when you cross the meridian and the scope swaps sides. The error will be twice that of your non-orthogonality. You can fix this by adding shims under your mounting rings (very difficult if you have only one ring holding the scope on the mount), or you can ignore this by recalibrating on a known star when you do swap sides before proceeding to a faint fuzzy. Once you are on the other side, even if you have an orthogonal error, you will find that most objects will be centered in the field if you have first recalibrated on a known object.
More from a member of the AP goto group: ...I was initially disappointed with the pointing accuracy
of my setup when compared to my previously owned GOTO mounts.
(Well, actually I am still disappointed.) The lack of pointing
accuracy was due to the fact that the optical axis of my telescope
was not orthogonal to the AP900. The AP mounts rely 100% on this
orthogonality and precise polar alignment for pointing accuracy.
That is, there is no compensation for these errors provided in the
hand control software. You can hook up external software like The
Sky to get this feature. The AP manual describes a way to determine
the amount of orthogonality error. In the end, I have learned to
compensate for the lack of orthogonality by making smaller jumps to
targets on the other side of the mount rather than fixing the
orthogonality error.
A second but related area of confusion was when to use Recal vs
Sync. The correct answer is to use Recal to improve the pointing
accuracy for the next object. That is, after acquiring a target,
center and press Recal to improve the accuracy of the next slew.
Polar Align during the day:
I have developed one method to use in the daytime that allows me to get
essentially perfect polar alignment for CCD imaging. In the past I have
wasted a lot of precious dark time trying to line up the mount with drift
alignment. This is especially true in the summer when the sky does not get
dark till after 9pm. The daytime drift method starts out with the scope in
Park1 position. I go thru the Park1 - Park2 - Park1 sequence with the bubble
level so I can set my altitude axis as close as possible. This is followed by
a slew to the Sun (NOTE: DO NOT LOOK AT THE SUN WITHOUT A FILTER!!). The
azimuth axis is then adjusted to center the sun. Slight touchup of the
buttons may be required to accurately center the sun. Then I do #9Rcal to
sync this position of the mount. Now I'm ready to find a bright star in the
daytime sky.
Using the Stars List, I slew to a bright star and pick it up in a low power
field. Right now Vega is ideal for that. The CCD camera is attached, and I
choose my Ha filter. I purchased an inexpensive Ha filter from Edmund
Scientific and fit it to my SBIG filter wheel in the Moon filter position.
Not a great filter but gets the job done. This filter knocks out 99% of the
bright sky and allows Vega to come through at 0.12 second exposure. I have
also used Altair at .5 sec exposures. I do my focus and go directly to T&A in
the CCDOPS program. I set it for perhaps 20 exposures with additional dark
frames between each exposure. These darks are not needed for the image, but
buy me extra time between actual image exposures. This way, it takes about 25
seconds for each image to appear, and allows me to see the drift in both
axes. The T&A graph shows the direction of drift and the number of pixels for
each exposure. After 3 or 4, I can see immediately how far off I am.
I concentrate on each axis one at a time. The Dec axis drift is first
adjusted by moving the azimuth adjusters approximately 1/4 turn. The star is
then re-imaged (centered if necessary) and the drift in Dec is noted. It will
either be better or worse. In my case, I know that an "up" drift in the curve
means that I have to turn my Az adjuster counterclockwise. I have pasted a
small pointer on the knob to make it easier to see small increments. It
typically takes me 3 - 4 iterations before I get less than 1 pixel overall
drift in a 5 minute time period (my focal length is 3700mm, so it is very
sensitive to misalignment). In the meantime, I have ignored any drift in RA.
By the way, it is important to turn off the "Relay" function in T&A so that
the image is actually allowed to drift.
When Dec is zeroed out, I do a similar adjustment to RA by adjusting the
altitude axis. These adjustments are easy to do, and are straight forward. It
takes a bit of practice to get used to the steps involved, but if everything
works out and I don't get disturbed in the process, I can get very good
alignment in about 1/2 hour, all the while the sun is up.
Drift Alignment Info:
My old notes to myself: http://www.dl-digital.com/astrophoto/Documents/astro_drift_align.htm
My old notes, using STV with G11: http://www.dl-digital.com/astrophoto/Documents/STV_alignment.htm
http://home.comcast.net/~astrophoto/Articles/Polar_Align.htm
http://www.covingtoninnovations.com/astro/iterating.pdf
http://tech.groups.yahoo.com/group/ap-gto/message/5171 (relevant text at end of this page)
http://home.twcny.rr.com/rkellog1/pol_align.htm
Per AP for the 900GTO mount:
After all the talk of alignment above, if my math is correct I can afford to be quite a bit away from perfectly aligned and still not worry about field rotation with 4 minute exposures. Here's a list of things to look for when there are tracking issues from a post by Roland C. in the AP group:
I have no experience with the STV as a tracker, but I have heard that
others are having problems also with all different mounts. It might
be a good idea to check out the SBIG user's group to see what others
have found. Here's what you need to do first of all to make sure your
system is sound. Get yourself a crosshair eyepiece and monitor the
motion of a guide star on the crosshairs with no inputs to the servo
controller, other than your keypad. Do you see the star dancing all
over the place? If so, you might have an atmospheric seeing problem.
If not, do you see any rapid drift in declination that needs to be
guided out? If so, then your polar alignment is off, most probably
the azimuth axis. Remember, any drift in declination is NOT the fault
of the mount, since that axis is not driven.
Then check drift in RA. This should be a slow back and forth movement
to describe a smooth sinusoid with a total time period of about 7
minutes for one full cycle. You can characterize your periodic error
by simply offsetting your azimuth a few degrees and taking a 7 to 8
minute unguided CCD exposure (or film if you have no CCD camera). The
resultant squiggle can then be analyzed to give you all kinds of
vital information that you will need to set up your guiding later on.
If you don't do these things (and many beginners fail to do them),
you will not have the info needed to do a first class imaging job.
When I set up my SBIG CCD camera for guiding, I calibrate (always at
1x speed) with the guiding chip on the side of the mount that I will
be imaging. If I then go to the opposite side of the sky, I have to
either re-calibrate, or go into the guiding parameters in CCDOPS and
swap motion. Otherwise, the system will go ape - i.e. all errors get
worse with time rather than better. I also use an aggressiveness of
7, which essentially means that the camera will correct any error
only 70% so as to avoid error overshoot and oscillations back and
forth. I normally guide at 1x, or .5x with my 146 inch focal length
scope. In your case, you have a much shorter focal length, so there
is no reason that the star should be hunting all over the place,
unless the sky is very unsteady. Then you should not even try to
chase the guide star, rather turn the aggressiveness down even
further. If your Dec axis is jumping all over the place, there is
definitely something wrong with your guiding parameters, because
normally the guide star motion in Dec is close to zero in a well
polar aligned mount. There is no reason the star should be moving at
all.
Finally, there is another test you can do with SBIG cameras. You can
go into their Track & Accumulate mode, set it for 20 - 30 or so
exposures at 10 - 15 seconds each, and then watch the little chart on
the page. It will plot for you the actual motion of your chosen guide
star without the mount getting any external commands. This is the
purest way to see whether your mount is tracking well all by itself.
You will see a gradual motion in the Dec axis that reflects quite
accurately how well you are polar aligned. You will also see the
periodic error in your RA axis presented as well as any constant
drift due to polar misalignment. In fact, I used this chart recently
to super tune my observatory 1200 mount. I was able to get the dec
axis flat for 5 minutes with not 1 pixel of motion by adjusting my
polar alignment.
If you know what your maximum periodic error and its shape is, then
you can plan your maximum guider exposure time. For instance, my 1200
mount with its well worn-in RA worm has a 5 arc sec P-P error
maximum. I could reduce this by training the PEM, but this is not
really necessary even with my 146 inch focal length. The 5 second
error occurs twice over a 6.4 minute time period (picture a sine wave
from bottom to top back down to bottom). The error has two points at
top and bottom where the star does not appear to move at all for a
long time, and then a connecting period between the upper and lower
peaks when the star is moving at the maximum rate. This time is
approximately 3.2 minutes (194 seconds) where the star is moving 5
arc seconds total in RA. So the rate is approximately 38 seconds of
time per arc second of movement in RA. If I want to limit my maximum
error to 0.5 arc seconds, then I can take up to 14 second exposures
with my guider (minus the download time etc) and still have perfectly
round stars. I can also take 14 second Track & Accumulate images all
night long and have a very nice result.
Some things that can screw up your guiding that you should watch out
for:
1. wires dangling off the back of CCD cameras that can subtly "pull"
the camera position in the focuser as the mount slowly tracks across
the sky. Place the wires along the tube assembly and tie securely to
the mounting rings before dropping them to the ground below.
2. the fan on the ST7/8/10 adds a lot of vibration to the system. You
cannot disconnect it, but what i have done is to isolate it
completely from the camera body by glueing it to two layers of carpet
backing with a hole cut into the backing to allow airflow. Carpet
backing can be purchased in large sheets at KMart for a song. It is
gummy soft rubber, about 1/8 inch thick and is full of holes. The
mounting screws cannot be used, so make sure the glue holds well. I
use Pliobond. Without doing this, my stars are not round, but measure
sometimes 1x3 arc sec, depending on the orientation of the mount.
Worst orientation is looking due south.
3. People walking near the scope will shift the ground enough to
cause 1 - 4 arc second jumps in image position on the CCD chip.
4. Not fully cooled down scope will cause all kinds of tube currents
which can drive a guider nuts.
5. Put the Dec backlash setting to zero. There is no need for a
guider to get instant reversals. You cannot follow random motions of
guide stars, only the slow steady drift caused by slight polar
misalignment and the natural periodic error of the worm.
...
There are others which I can't think of right now. I hope I have
given you some info. Good luck. It can be done. I know because a
complete Doofus like myself has figured it out (just took me a month
of sundays).
Roland Christen
hits
Summary of drift method:
First:
figure out if hand controller is right.
second figure out correct orientation of camera
Monitor only declination drift.
Use stars on the celestial equator.
Star on Medidian
a. If the star drifts south, the polar axis points too far east.
b. If the star drifts north, the polar axis points too far west.
Star on eastern horizon (actually 6 hours offset from meridian)
a. If the star drifts south, the polar axis points too low.
b. If the star drifts north, the polar axis points too high.
If you can determine the drift rate in arc seconds per minute
then you can convert it to mount error. This was found on
the internet:
To convert drift error to mount error:
E = (atan(b1/(15*b2))*360)/(2PI)
E = polar alignment error in arc seconds
b1 drift in arc seconds
b2 drift time in seconds
Or:
15.7 arc seconds per minute translates into an
alignment error of one degree (for alt or az).
To convert mount error to screw turns:
From Roland:
On the 1200 mount, the azimuth threads are 24 TPI at a 4.5" distance,
which comes out to .53 degrees per turn, on the altitude axis, the threads are
20 TPI at about 5.7" distance, which comes out to .5 degrees per turn. So
each axis moves at close to 1/2 degree for each full rotation of the knob.