Above: Adjusting the b channel by equal amounts. By making the curve steeper, you increase the visible differences between colors, increasing the color range of flat images.
I have struggled a bit in finding a suitable image processing workflow with the Nikon D810A. Here's what I do right now, followed by a discussion of what did not work.
I shoot 5-minute RAW sub-exposures at ISO 400 using Backyard Nikon or the camera's built-in intervalometer. I take as many dark frames as I can at similar temperatures and the same ISO. I take flat frames (at least 12) using an EL panel at ISO 200, with the same aperture for the lights if using a camera lens. ImagesPlus and DigiCamControl also can control the Nikon D810A. I believe you may need to purchase a special module with IP.
I focus with a Bahtinov mask, usually just using live view image on the back of the camera (super convenient!)
I usually capture flats with an EL panel but I used sky flats on my Andromeda image from 2016 and they worked pretty well.
I use Deep Sky Stacker for "reduction." E.g., DSS manages the application of the flats and darks to produce a calibrated image. DSS now supports D810A .NEF files natively, which I didn't realize until recently. I was needlessly converting the .NEFs to .dngs.
Image stacking is with DSS (for sequential images of the same target if I'm feeling lazy) or with Registar. Registar handles mosaics much better than DSS, and is generally awesome.
DSS is the only software I have found that can properly apply flat frames, at least with the way I'm doing things. Flats were better with the telescope at f5.4 than with faster and wider-angle camera lenses.
I then process in Photoshop as discussed later on this page.
What did not work for the D810A?
ImagesPlus does not do a good job with flat-fielding for me. DSS does a good job with exactly the same images. The IP support people took a look at this problem and their best suggestion was that my flat frames are not similar enough in luminance for IP.
This page has a discussion of the flat-fielding problems with IP.
In fairness to IP, I tried flat-fielding with Nebulosity also with poor results.
In 2016 I processed some of my Andromeda Galaxy frames with IP and it was OK. So there's still a bit of mystery here.
Do you have a workflow for the D810A that produces good results? Please post to the D810A Yahoo Group!
I shoot 5 minute images (sub-frames), and lots of dark frames (16-50) if possible. I also a shoot flat frames (8-32) with an EL panel, with each filter if time permits, but it looks like flat frames can be somewhat interchanged. The panel is shown on my "other astro equipment" page. I make darks and flats on the same night as I shoot if clouds permit, but I avoid wasting time shooting darks and flats under clear skies.
I focus with each filter when using the fast focal ratio FSQ-85 scope. My Astrodon 36mm filters are supposed to be parfocal to f/4, however: a) my FSQ-85 is f3.86, and b) I wasted many hours of images by not focusing with different RGB filters; proving they are not reliably parfocal on my equipment. Having said that, there is almost always a temperature shift after an hour or so, meaning you should refocus frequently in any case for best results.
Focusing is accomplished manually with use of Bhatinov masks using the focus routines in MaximDL. The Bhatinov mask approach is simple, accurate, and highly recommended.
I switched to Maxim DL for image focus/capture and image reduction (flats fielding, dark frame subtraction) on the SBIG. Previously I used CCDSoft. CCDSoft is not being regularly updated in my opinion, and I had to go to a beta/daily build version of the software to use my filter wheel. Maxim's business is largely Maxim DL and they are much better at staying current with equipment. Software Bisque is focusing on a new package integrated into "The Sky."
I use Registar to stack each reduced FITS image of the same type object and framing. Where complex blending is needed, or when I'm going to turn a set of narrowband monochrome images into color, I align the different versions in Regisar, then use the Crop/Pad Image feature to make the images the same pixel dimensions.
I then copy and paste the monochrome images into my RBG color channel of choice to create a rough color image.
I will usually paste the H-Alpha image into the Luminosity channel in Lab mode, then then back that off to taste. I used the H-alpha version at about 50% in the red channel of my recent (2014) M8 & M20 area RGB H-alpha image here.
It's Photoshop CS6 from there as described below.
Here's a detailed description of how I processed my Lagoon Nebula natural color image (located here).
First I get each image aligned and processed so it's reasonably "bright." I used Registar to align each image, and padded each image to exactly the same size so I can do the remaining work in Photoshop.
I blended the narrowband images using the formula below. (I paste the narrowband data into the desired color channel with Photoshop, then fade the previous result based on the blending formula.)
I worked on the image with curves so it had a neutral background and nicely showed some color.
I added the RGB filtered data using Photosohop same as before, (fading the true color data to roughly set it to be the proper contribution based on the exposure time and judgment).
Once again, work on the image with curves looking for a neutral background and nice colors.
Towards the end, to deal with low-level noise, I blended in a modified version of the bright and smooth Ha data for luminance (e.g., paste Ha, sent blend mode to luminance, then fade that to maybe 25-33%).
I kept interim versions of everything to deal with blown-out highlights that resulted from enhancing the dim areas so they could be easily seen. Towards the end I went back, modified interim images to nicely show the highlights, and blended just the highlights in with layer masks.
Finally, I selectively blended in an interim image that helped enhance the contrast of the dark areas.
For Reference: I start with something similar to below, but then freelance... An approximation of natural colors may be achieved by the following narrowband blending:
Red = H-alpha + Sulfur II (approx 75% / 25%)
Green = Oxygen III
Blue = Oxygen III + H-alpha (approx 85% / 15%)
Another formula found on a PixInsight page says:
Red = 0.5*S2 + 0.5*Ha
Green = 0.15*Ha + 0.85*O3
Blue = O3
This is a popular color combination as well; I will create both Hubble Palette and Natural Color images from narrowband sub-frames in most cases.
Red - Sulfur
Green = Hydrogen Alpha
Blue = Oxygen
I am using the recommended workflow in Nebulosity and then use Registar and Photoshop as outlined below:
Capture in Raw (using 5 minute sub exposures) in Nebulosity
As of late 2010 I need to fix Bad Columns and I'm using Sander Pool's fixfits utility. Update, 2011, by getting good bias and dark frames at very close to imaging temperatures my bad column issues are greatly reduced. In 2013 I am no longer using bias frames.
I previously used Nebulosity's Bad Pixel Map feature, but due to the bad column issue I'm using darks more often in 2013. I had two cloudy nights on a fall 2013 trip and took 150 darks for the trip, where all the nights had similar temperatures. The results combining the darks with a 1.75 sigma combine appear to be quite good.
Apply a Flat (which is done in the same step as using the dark)
Demosaic each image
Covert to Tiff format (I do this because Registar can't seem to handle the FITS files that Nebulosity puts out)
Stack using Registar
Process in Photoshop as noted below.
When using a H-alpha filter, I use the channel mixer to turn the image to monochrome using only the red channel. (See more info on narrowband filtering with this camera at the bottom of my Narrowband Imaging page.)
May, 2010: I sometimes use Deep Sky Stacker, Drizzle Image Processing, and AIP4Win's deconvolution filter to enhance the detail in dust lane areas.
I still shoot (as of late 2012) astronomy images with a Digital Single Lens Reflex (D-SLR) camera, namely the Canon EOS 20Da. This camera has a modified design especially for astrophotography. I always shoot RAW format images.
I shoot 4 minute exposures at ISO 1600, now with a 15 second delay between exposures (instead of 45 seconds which I used before) to let the camera cool down a bit. Through 2007 I shot at ISO 800, but 1600 is best! Make sure your darks are at a matching ISO!
I am using ImagesPlus v. 2.82 to convert the Raw images from the 20Da, and for calibrating my images with a "dark frame" and a "flat frame." I shoot darks while I'm changing targets, just getting them in here and there through the imaging session, and as I'm packing up. I then median combine the darks from the night and use them in my processing. I shoot flats during twilight, shooting about 16-20 and median combining them. (Update 11/2006, I am not currently using bias frames!) (Update 2013, I am gravitating towards a library of many darks from similar temperatures, rather than trying to get darks during the shooting night. I find that a very large # of combined darks works quite well. One thing to note is that the camera changes temperature as it starts shooting, seeming to stabilize after 30 minutes or so all else being equal. So, it's important to get darks capture during the same type of lengthy shooting scenario.)
In general, the dark frame is subtracted from each image frame, and the flat frame is calculated in to reduce vignetting. I'm using the IP workflow per the tutorial, but...
I often use Registar to combine images. Registar is easier to use than IP for images with different camera locations, and can handle radically different frames of the sky easily. Registar has a means to calibrate the levels of the combined frames that can work well for mosaics.
Then to Photoshop as noted below.
Photoshop rules for my final image processing.
I use Curves to manipulate the image.
I've started using the "Standard Curve" in Photoshop as described in "The New Astro Zone System for Astro Imaging" by Ron Wodaski and Russ Crowman. I saved one of these as an action I can run. After each run you need to set the black point in each color channel.
(Pre-2014) I have build an action that makes a series of small curve adjustments on the dark end of the image. The adjustments boost the low end but leave the stars end of things largely unchanged. I will run what amounts to around 10 small curve adjustments very rapidly to "pull the image out of the muck" and get the image in a good, workable range.
NR: Aside from "pulling the image out of the muck," additional noise reduction techniques must be applied to most images image due to the extreme "stretching" of typical astronomy images.
Noise reduction approaches: There several approaches/tools that can be used for noise reduction. Great results and ease of use are my top priorities. While some free tools may be available, I'm willing to pay for tools that meet my needs in this area. I use a couple of plug-ins. Neat Image is my favorite, and it is easiest to use when there is a fairly blank area of sky (no stars, galaxy, nebula, etc.) to select. I also use Grain Surgery in cases where I can't easily use Neat Image.
Aside: The best noise reduction in Photoshop alone (i.e., if you just using what comes with Photoshop) is based on strategic selection of areas to blur, with application the Gaussian blur. You can select a color range, or use the wand tool with a small # tolerance like 4. You can do this differently in each color channel.
Some images have issues with gradients, and I use and recommend the GradientXterminator plugin.
A few more (basic) details regarding what I do in Photoshop is at this link: Basic Image Processing in Photoshop.
A discussion of more Advanced Photoshop Processing Techniques for astronomy pictures is here.
Also, see the LAB curves technique I'm using, described below. This helps bring out the colors.
Star Shrinking: In 2012 or so I investing in Noel Carboni's "Astronomy Tools" for Photoshop which was $22 very well-spent. Previously, in late 2008 I began to include star size management using a technique similar to the one on the top of this page.
The HDR toning feature in Photoshop CS5 & CS6 is useful for final color enhancements.
There are many ways to select stars and Noel Carboni's tools have an action that works well. The trick is to properly expand & feather the selection.
Tight stars? Expand about 3-4 pixels and feather about 50% of that.
Bloated stars? Expand up to 7 pixels and again feather around 50% of the expansion.
There are lots of ways to "add color" to a flat DSLR astronomy image. A classic: apply an "S" curve to the image. (Image->Adjustments->Curves, pull up the right/bright part of the curve, and pull down the left/dark part of the curve.) You can use Image->Adjust->Hue/Saturations, but purists shudder at this.
However, using this LAB technique has advantages as enumerated in Dan Margulis' books including "Photoshop Lab Color" and "Professional Photoshop." It's pretty simple.
Convert Image into Lab. Alt-I-M-L gets you there (Image->Mode->Lab).
View the "a" channel. Ctrl-2 gets you there. It will look very strange.
Here's a trick: Hit the ` key to the left of the # 1. This displays the image in color, but with a channel selected for any manipulations.
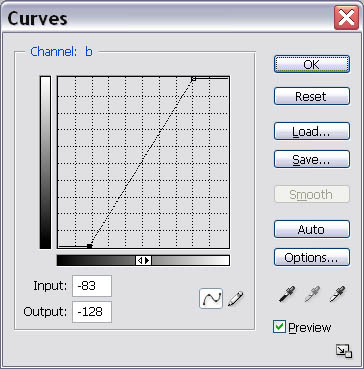
Bring up the curves function. Now, make the curve steeper, but keep the center point the same. The curve is a straight line. Do the same with the b Channel. See example below.
How far to go is a judgment call. If you'd like the subtly change the overall color balance, you can vary the line so it doesn't exactly cross the center point. Don't go too far with this!
Blur a/b channels? Other things you may wish to do in lab include blurring the a and b channels a bit, or maybe a lot, to help get rid of noise. This can help keep star colors under control (see caveats.)
Adjust the Luminosity channel. Be aware, thought, that pulling up the luminosity curve to better show the dim parts of your image will tend to flatten colors/reduce color saturation. (You can go back to step 4 again, if you want.)
Ctrl-' gets you back to all channels selected
Convert back to RGB. Alt-I-M-R gets you there.
Example: check my M31 page, including the images at the grid at the bottom of the page, showing where I started color-wise, and where I ended up.
Caveats: There are many, but the main caveat is that this best with images that are not already highly colorful. This technique also tends to exaggerate chromatic aberrations around stars, so this may need to be mitigated. (I should note that blurring the a/b channels in lab helps with this as described in step 6.)
Recent Update: The HDR toning feature in Photoshop CS5 & CS6 is a good alternative for adding color, especially for adding the finishing touches on a good image that could stand additional saturation.
Above: Adjusting the b channel by equal amounts. By making the curve steeper, you increase the visible differences between colors, increasing the color range of flat images.
Below Left: notice how flat this DSLR image seems; little color.
Below Right: Some color is starting to show after using the lab technique described here.
 A starting point for the M31 images on this page: Pretty Flat! | 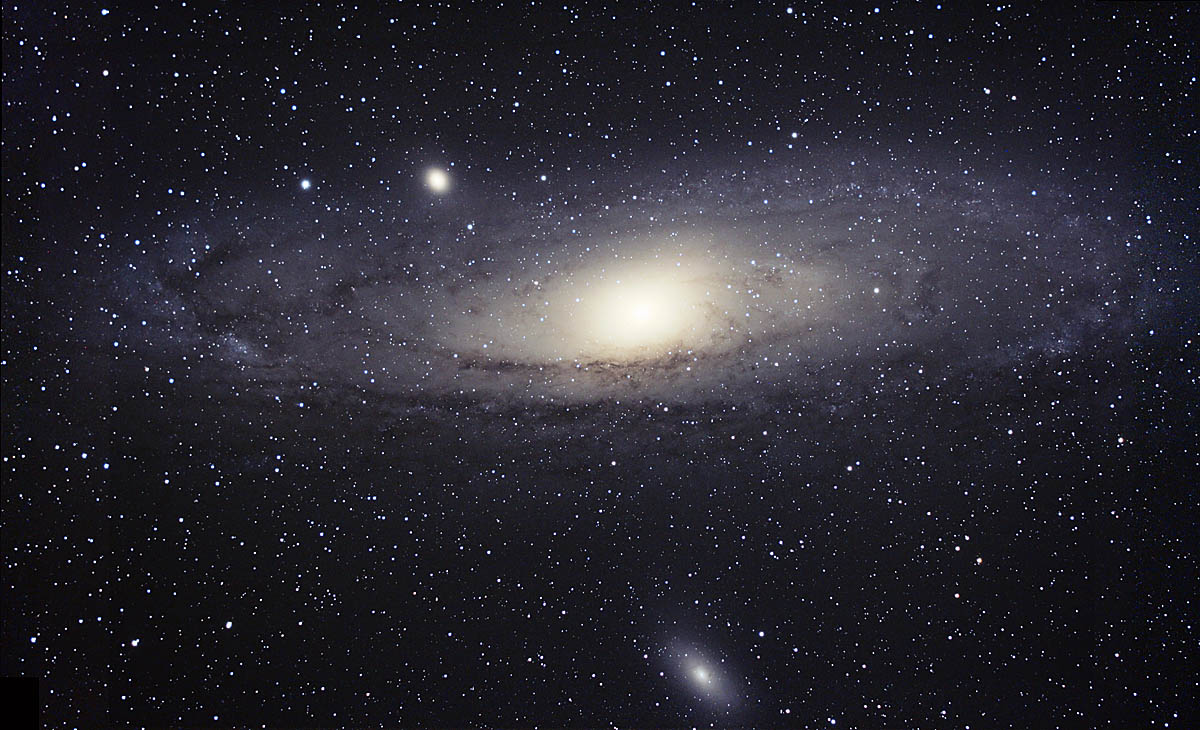 1st Cut 20Da image stack. 1200 pixels wide. Some Photoshop Lab processing to accentuate the color differences by steepening the 'a' and 'b' curves. |
| Basic Image Processing in Photoshop
|
|
| Excellent Photoshop Astro Techniques Link | Matt's Star Shaping |
| Selecting Stars | More Photoshop Tricks including shrinking stars |
Noise Reduction example: Stacking astropix.
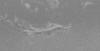
Check out my Veil Image in the LAB color space "a" channel
Current Astrophotography Capture Equipment
Advanced blending in Photoshop is discussed on my page here.
Astronomy Pictures: Dick Locke's Astrophoto Gateway page....
Copyright © by Dick Locke. All Rights Reserved. Last update: October 2013
Contact and Image Use Information hits.
As of 2012 I tend to use Noel Carboni's Photoshop actions to select and shrink stars.
For Reference: Wei-Ho's star subtraction technique
Instead of (de)selecting stars, what I do is to subtract stars, enhance
everything else, and then add the stars back. Stars can be subtracted
using a high-pass filter. The basic steps are like this:
1. duplicate the image
2. high-pass filter the dup, with a radius about 4-10 times the size of
the faintest stars.
3. level the high-passed image. Change the lower input level from 0
to 128, and the higher output level from 255 to 128.
4. subtract this high-passed, leveled dup from the original.
5. enhance the star-subtracted nebula image
6. add back the high-passed, leveled dup.
There are several variations. For example, you can very easily
select the non-stellar components in the product of step 3, set
the background to black, then push the 'delete' key. This will
prevent nebula components being subtracted in step 4. You can
also do more than two times of star subtractions with increasing
radii in the high-pass filtering. This will get rid of stars more cleanly.
I've often thought that DSLR and CCD images seem relatively flat and monochromatic when compared with the film images from back in the old days This is true especially in the reds, where DSLRs generally have a relatively weak deep red channel. Popular astrophotography films have had a strong red response, including Kodak's PJ400, LE 400, and Supra 400 (all out of production), as well as Kodak E200 and Fuji's SHQ 200. A reason red is so important: Hydrogen Alpha nebulae glow at a wavelength of about 656 nanometers. Any sensor, be it film or a CCD/CMOS chip, that has poor response in this area will be omitting a critical component of the image of the sky where H Alpha is present. My previous DSLR, a Nikon D100, had a weak H-alpha response, along with relatively high noise. The Canon EOS 20Da was dramatic improvement in both these area. That camera had a modified design especially for astrophotography, but still shoots perfectly good daylight images without any special filters. (Good info on H alpha here.) In early 2008 I had my 20Da modified to further improve its H Alpha response.