Dick Locke's Astro-Imaging Setup Fall 2011
Many folks are interested in the equipment and techniques used to produce the astronomy pictures on my web site. This page covers the equipment.
Celestron C11 EdgeHD 2800mm (110") F/10, 11" diameter which is 280mm SCT acquired May 2022 after a months-long wait - for Moon & Planet imaging from the back yard!
Astro-Physics AP 900GTO mount (replaced my Losmandy G11)
SBIG ST-8300 Monochrome CCD Camera (early 2011)
Takahashi FSQ-85, the "Baby Q", a small, wide-field APO refractor (March 2011)
Bahtinov masks greatly simplify focusing and I highly recommend that you use one. The masks set up a pattern of spikes on a bright star, which become symmetrical and sharp when good focus as achieved. The mask works well even when seeing is bad (and bad seeing hoses up traditional focusing metrics). I have a Spike-a mask for the TOA. There are some comments on the GoldFocus mask near the bottom of this page.
I use an EL Panel for flat field imaging, as shown on my "other astro equipment" page.
Various tripods and heads - see bottom of page for listing
"Regular" DSLR camera equipment is also involved in astrophotography
I'm using a Losmandy Starlapse for panning time lapse movies.
In 2020 I acquired a ZWO ASI ASI462MC COLOR PLANETARY CAMERA that is a lot of fun and a perfectly competent autoguider. ASI462MC is the latest color planetary camera of ZWO which adopts Sony IMX462 1/2.8” (5.6x3.2mm) format 12bit ADC sensor. The 2.9um pixel size accommodates a well depth of 11.2ke with a total of 2.1MP pixels. The format of the IMX462 sensor is 1/2.8”. The sensor length and width are 5.6mm*3.2mm and the diagonal is 6.46mm. The resolution is 1936*1096.
In 2020 ZWO ASI290MM Mini Monochrome guiding camera - ASI290MM Mini camera integrates Sony IMX290 1/3″ sensor (5.6 mm x 3.2 mm). This camera has 1936 x 1096 pixels. The pixel size is 2.9 μm x 2.9 μm. This camera provides 12bit ADC and its QE peak is over 80%.
In 2020 I added a Sky-Watcher Evoguide 50ED APO guide scope (242 mm focal length and f/4.8) that I'm attaching to my finder bracket for a much lighter-weight solution than the ST80 (shown on the left of the pic below)
In 2021 I decided to go with a QHY QHY5III485C Color
Planetary & All-Sky Camera especially for lunar imaging. Sensor Model:
Sony IMX485
Effective Pixels: 3864 x 2180 (8.4 MP)
Image Size: 12.86 mm
Diagonal, Type 1/1.2
Pixel Size: 2.9um x 2.9 um
AD Sample Depth: 8-bit/12-bit with output as 8-bit and 16-bit
Color Filter Array: Bayer
Full Well Capacity: 12,236e-
Readout Noise in Standard Mode: 1.0e- to 2.4e-
Readout Noise in sHGC Mode: 0.6e- to 1.09e-
Full Frame Rate: Full Resolution 44 FPS @ 8-bits, 18.5 FPS @ 16-bits via
USB3.0 port
Retired: SBIG STV autoguider. This doesn't allow "dithering" but otherwise is a great stand-alone (no computer needed) auto-guider. Here's how to use the STV to get a good polar alignment.
Retired: sold Canon EOS D20a (Discontinued some time ago!)
Retired: QHY8 CCD Camera
Sold: In 2020 I acquired a ZWO ASI ASI462MC COLOR PLANETARY CAMERA that is a lot of fun and a perfectly competent autoguider. ASI462MC is the latest color planetary camera of ZWO which adopts Sony IMX462 1/2.8” (5.6x3.2mm) format 12bit ADC sensor. The 2.9um pixel size accommodates a well depth of 11.2ke with a total of 2.1MP pixels. The format of the IMX462 sensor is 1/2.8”. The sensor length and width are 5.6mm*3.2mm and the diagonal is 6.46mm. The resolution is 1936*1096.
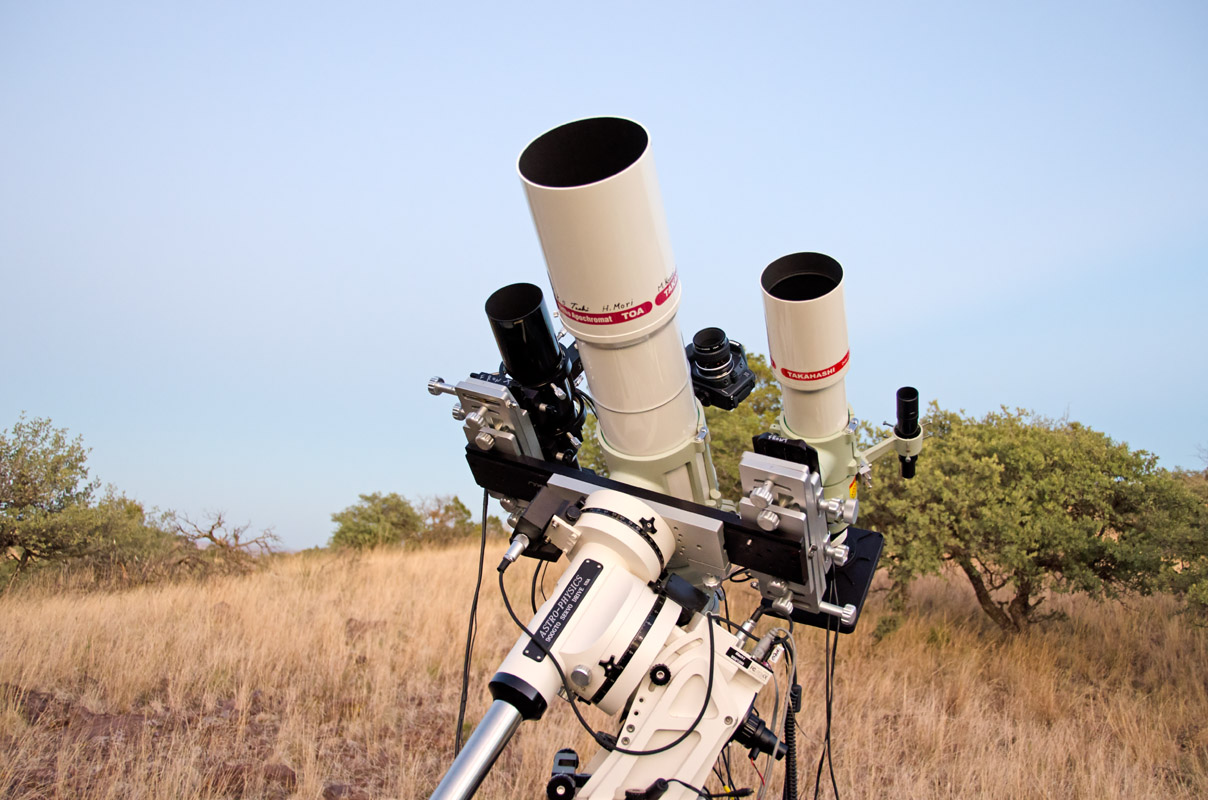
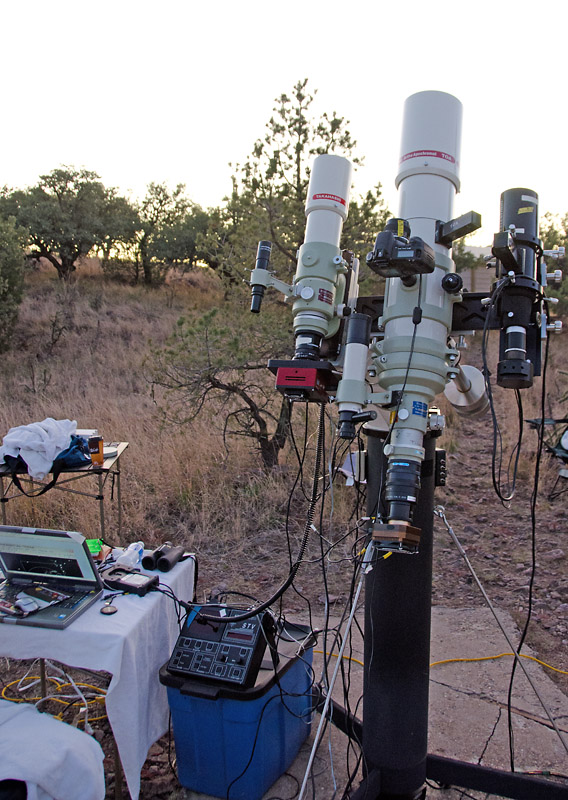
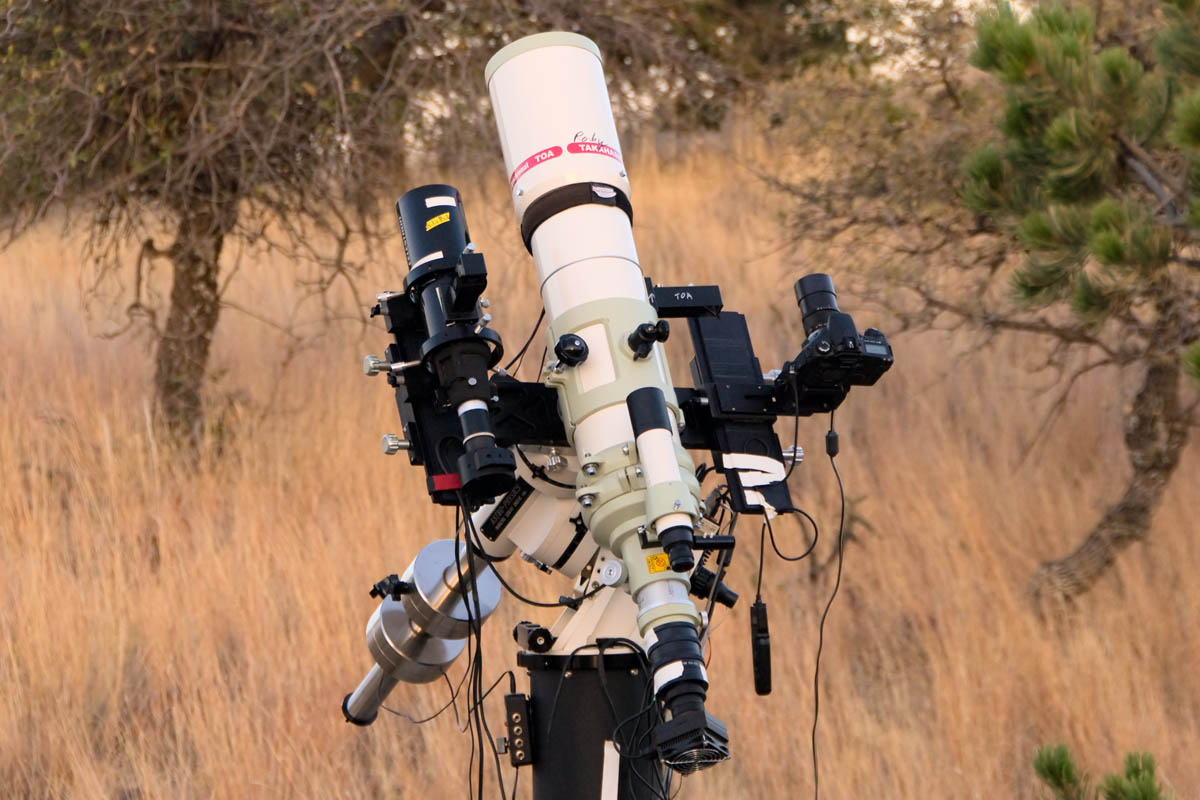
TOA 130 Middle, FSQ-85 on right, ST-80 Guide Scope left, AP 900GTO mount holding it all. Note the Robin Casady triad bar and TGADs (Tandem Guidescope Aiming Devices, TGAD) that allow independent positioning of both the guide scope and FSQ-85 imaging scope. I was a little nervous about whether the TGADs could handle the weight of the FSQ-85 plus SBIG-ST8300 & filter wheel... But no problem at all. That's a Canon 20Da with a 55mm Nikon lens on top, allowing me to run 3 imaging cameras at once with this rig. These shots are from the Fall 2011 trip to the Davis Mountains. Scroll down to the bottom of this page for additional thoughts on the Casady equipment.
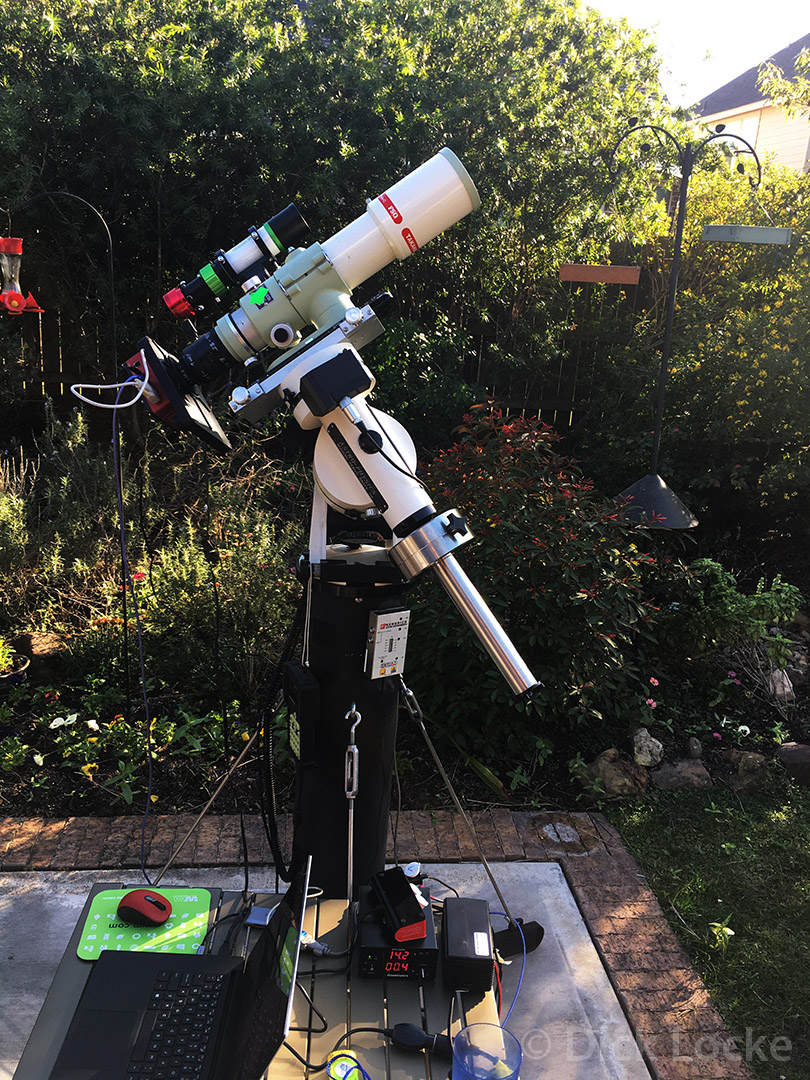
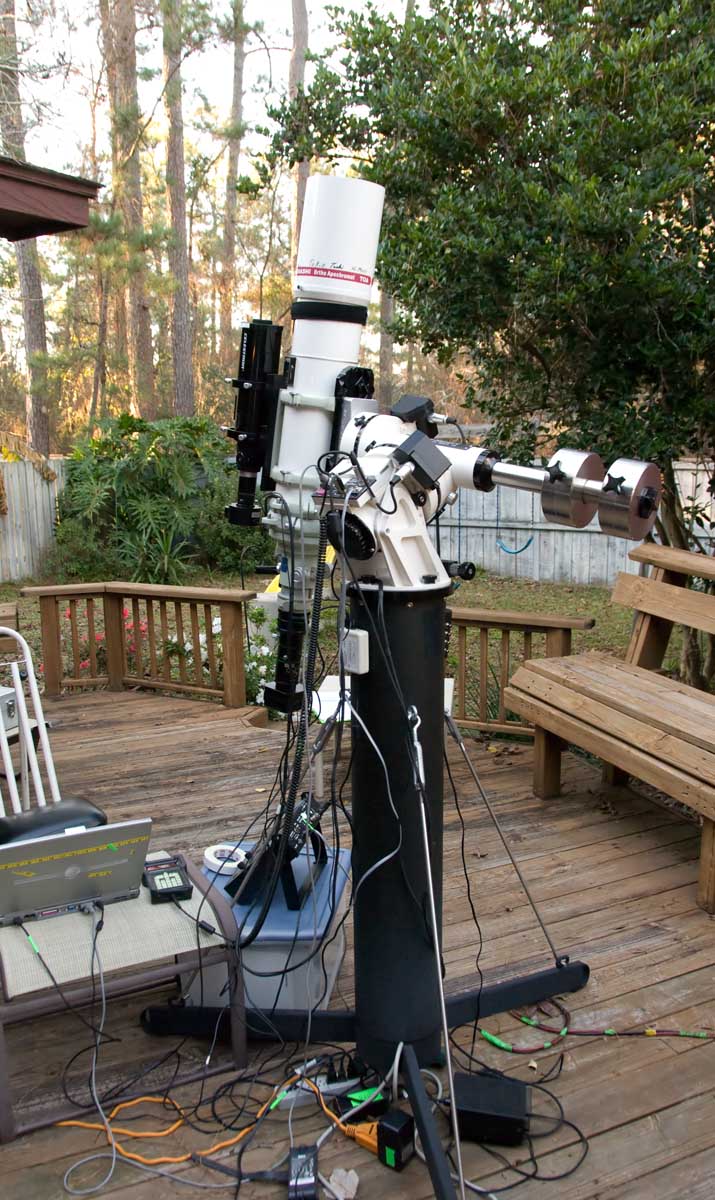
I have updated and modernized my astrophotography setup in 2020/2021. Since I started this pursuit about 20 years ago a lot of my equipment was really old to the point of being antiques! I've gone with a lightweight guide scope and mini guide camera (shown above on the top of the imaging scope), instead of my old stand-alone SBIG STV guider. This, in turn, required me to use PHD software on my laptop to guide, and my old Windows XP and Windows 7 laptops didn't really cut it for that, thus the Dell I9 laptop. Also note the Powerwerx Variable 30 Amp Desktop DC Power Supply with Digital Meters on the table, that thing is awesome and I can use it as the single DC source for the mount and power-hungry dew heaters. I also upgraded the AP 900GTO mount's control unit from the old CP3 to the newest GTOCP4 & the firmware on the hand controller to the latest version.
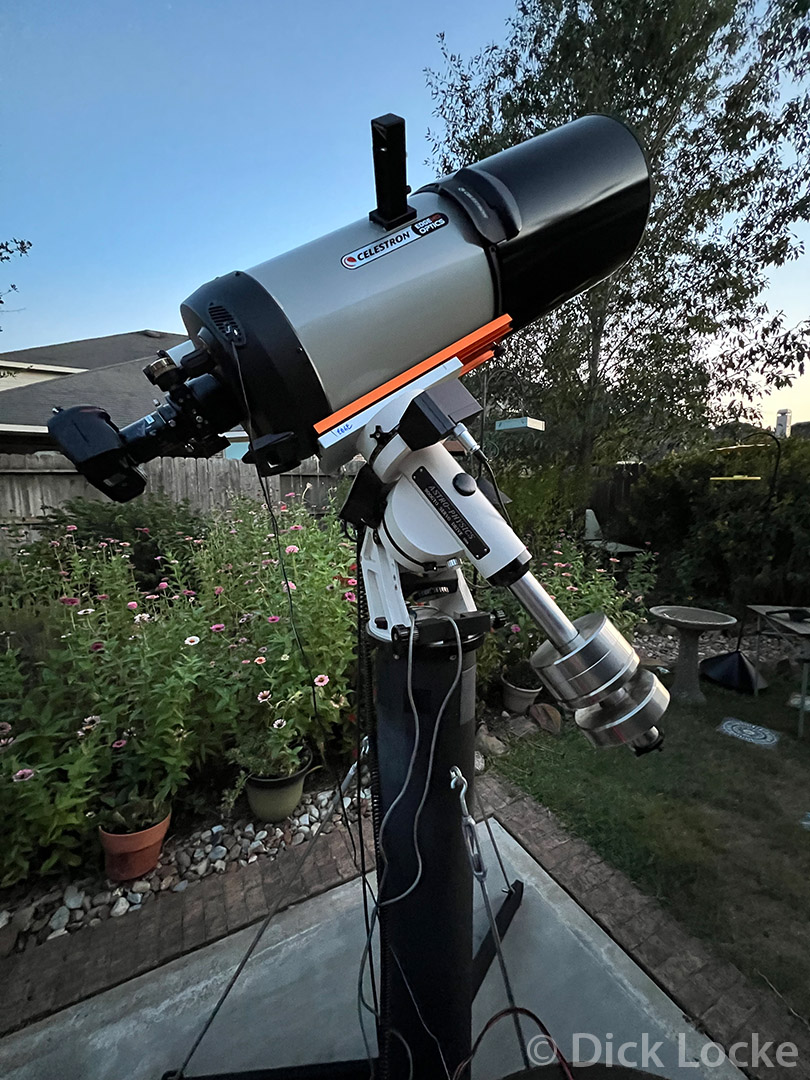
C11 with DSLR setup July 2022
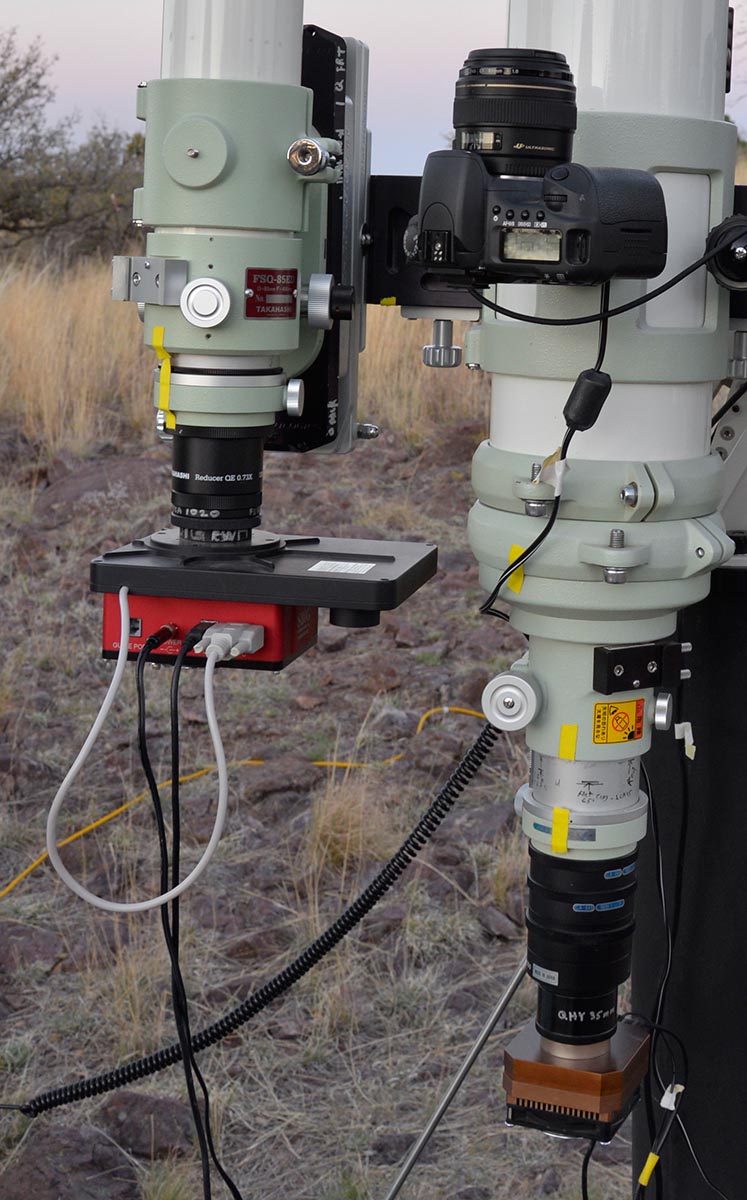
This shows the "old" reducer for the TOA 130; I am looking forward to trying out the new, redesigned Takahashi reducer. You may also note that I tend to write on my equipment. This really helps me remember how to set up the many permutations of my telescope and cameras.
That's a SBIG-ST8300 camera with filter wheel on the Takahashi FSQ-85 telescope (left), and the QHY8 camera on the Takahashi TOA 130 (middle).
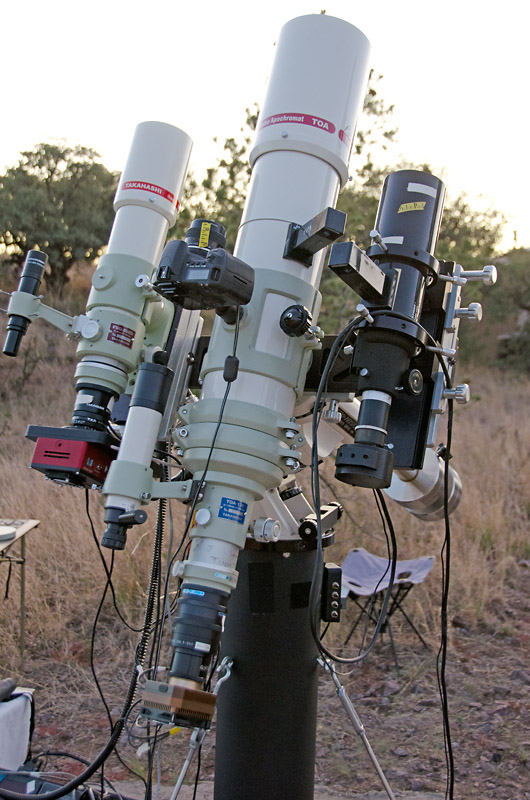
See above for equipment notes. The QHY8 camera has faded to a gold color where it's been exposed to the sun.
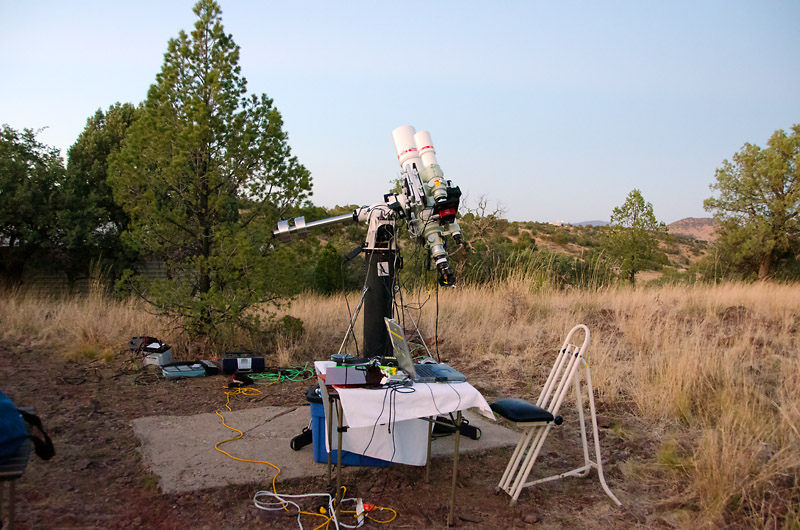
Below are a few images of my "set up" from my Spring 2010 trip to the Davis Mountains.
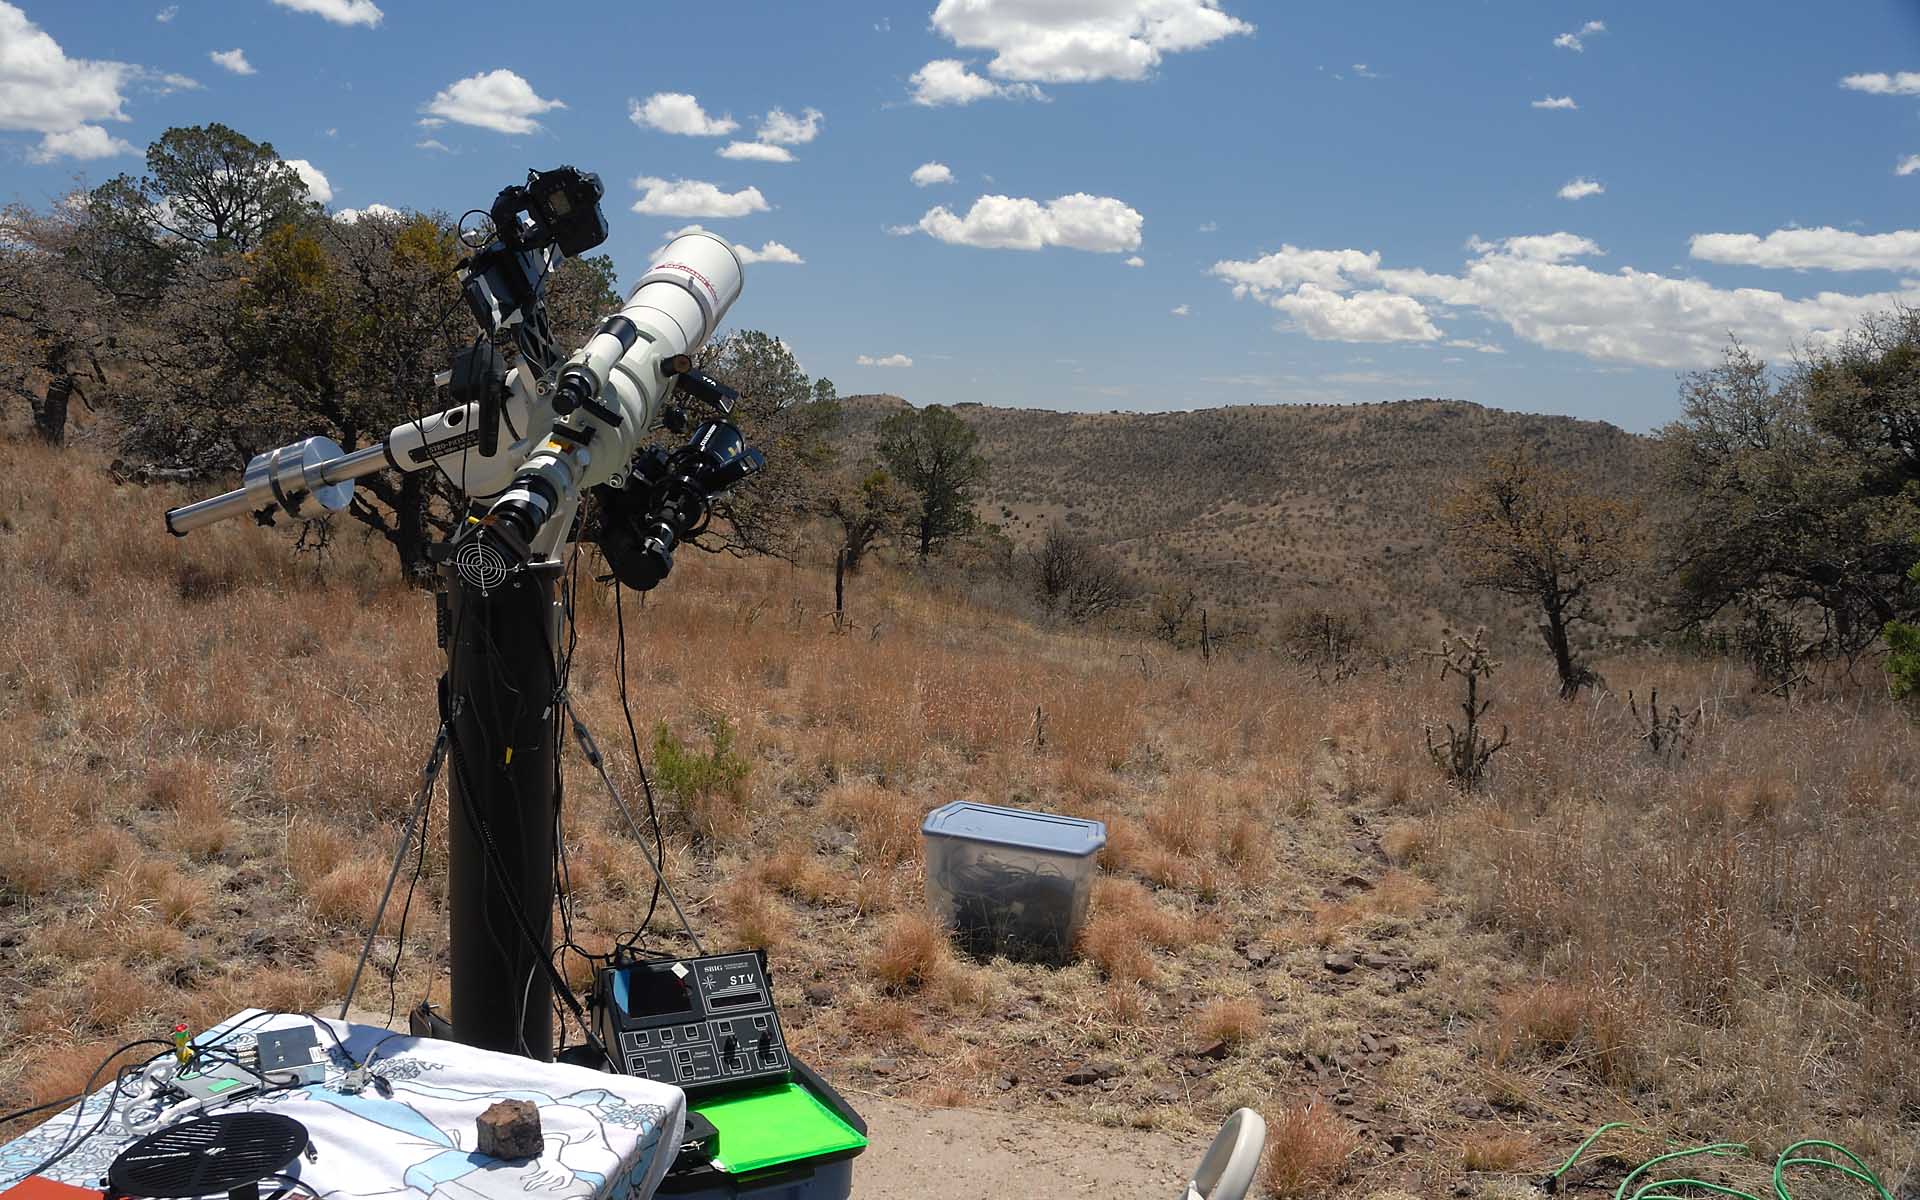
Looking West, Scope Facing North (Clear Skies!)
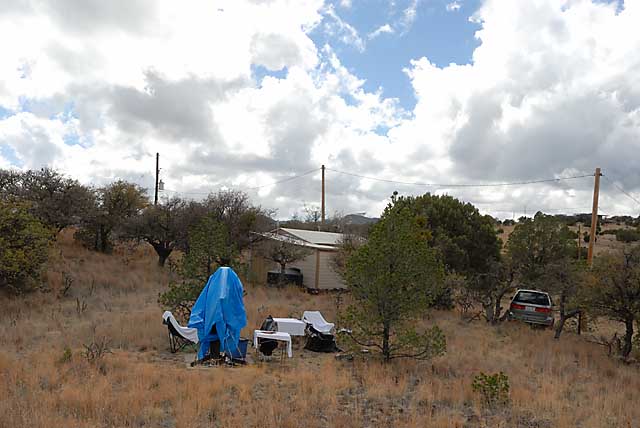
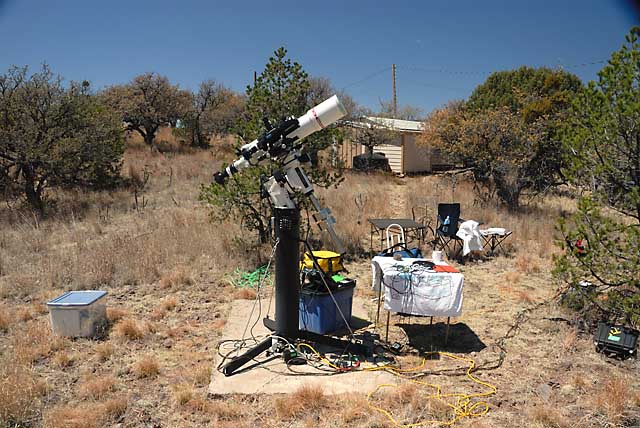
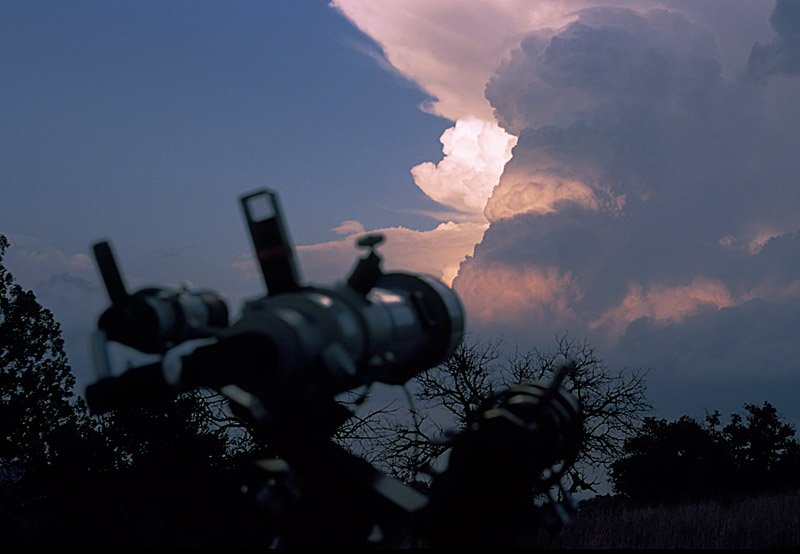
Wide Angle of Davis Mountains Setup - Cloudy/Rainy Mode
Facing East, towards Scorpius and all the good stuff in and around the summer Milky Way.
I am able to run two astronomy cameras at the same time. The picture above shows how I do this with my "triad bar" configuration. The guide scope, an ST80 attached via a Losmandy plate and rings, with a SBIG STV autoguiding camera, is on the left. The Takahashi TOA 130 Telescope is the main imaging scope in the middle, with the QHY8 CCD camera and Tak focal reducer attached. The Canon EOS 20Da Digital SLR is attached on the right using a Losmandy plate and DCM 2 camera adapter. During this trip I used an Olympus Zuiko 135mm MC f2.8 lens on the Canon DSLR via use of an small lens adapter ring. Note the camera is out to the extreme right, which allows better balance as well as more clearance from the main scope (so as not to get the scope in the picture). Also note the white gaffers tape, which I use liberally to secure wires so they don't end up ruining exposures by tugging on the equipment, or coming loose in the case of the 3 wires to the QHY8 CCD camera. All this is hooked up to and sitting on the Astro-Physics AP 900GTO mount.
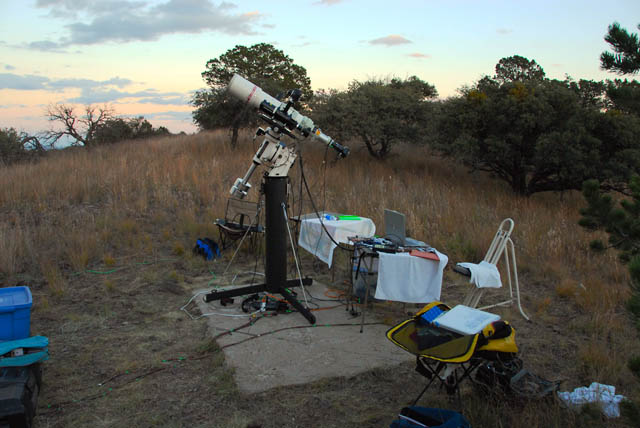
Above: Example Astro-Imaging Equipment & Setup (Davis Mountains, 2008)
Major components are the laptop with the AP 900 hand controller next to it, the ST-V autoguiding control box on the blue plastic tub, the AP pier topped with the AP 900 Mount, TOA 130 attached to the QHY8 CCD camera (for imaging), an ST80 guide scope on top of that, with the STV CCD camera (for guiding) attached to it. There's a USB connection between the imaging camera and the laptop, and a serial connection between the laptop and the mount. Guiding commands are sent via the thin grey cable from the STV to the mount. The mess of wires on the bottom includes the laptop, QHY8, and STV AC to DC converters, another converter that powers the mount (block box on right), and a red/black cable pair providing DC power to the dew heater. The black strap on the top of the scope is what actually warms the scope and objective lens slightly to help prevent dewing.
| Buying a Telescope - general information |
 Astronomy Photos |
Computer Equipment - What I'm using now |
| Processing Astrophotos | Old: Olympus C4040 Zoom | Old: Nikon D100 Images |
Other Astronomy
Equipment,
|
Basic Astrophotography | For Sale |
Below I have a table showing calculated values important to astrophotography. It lists data about my cameras and the primary configurations I use when imaging. The unlabeled values, x and y, are arc seconds of sky captured with the scope/camera combination. Other columns show arc seconds per pixel for the combination. 2 arc seconds per pixel is a standard rule of thumb for a good match. See the Starzonia calculator page for more info.
| Scope | f | len mm | ST-8300x | ST-8300y | ST-8300 arc sec pix | ST-8300 bin 2x2 | ST-8300 bin 3x3 | QHY8 x | QHY8 y | QHY8 aspp | 20Dax | 20day | 20Da aspp | D810A x arcmin | D810A y arcmin | D810A aspp |
| Toa 130 1.6x Extender | 12.3 | 1600 | 29 | 38.7 | 0.70 | 1.40 | 2.10 | 34 | 51 | 1.01 | 32.2 | 48.3 | 0.82 | 77.1 | 5.16 | 0.64 |
| TOA 130 Flat | 7.7 | 1000 | 46 | 62 | 1.11 | 2.23 | 3.34 | 55 | 80 | 1.61 | 52 | 77 | 1.32 | 123.4 | 82.5 | 1.03 |
| TOA 130 Reducer New | 5.369 | 698 | 67 | 88 | 1.60 | 3.19 | 4.79 | 117 | 77 | 2.30 | 68 | 102 | 1.89 | 176.3 | 117.9 | 1.47 |
| TOA 130 Reducer Old | 5.8 | 754 | 62 | 82 | 1.48 | 2.95 | 4.43 | 72 | 106 | 2.13 | 68 | 102 | 1.75 | 163.6 | 109.4 | 1.36 |
| Baby Q | 5.3 | 450 | 103 | 137 | 2.48 | 4.95 | 7.43 | 119 | 181 | 3.58 | 121 | 182 | 2.93 | 274.3 | 183.4 | 2.28 |
| Baby Q Reducer | 3.86 | 328 | 142 | 189 | 3.40 | 6.79 | 10.19 | 164 | 249 | 4.92 | 157 | 236 | 4.02 | 376.3 | 25.6 | 3.13 |
| Cameras | pix w | pix h | img. Cir | pixel size | width mm | height mm | area sq mm | Delta QHY8 |
| QHY8 | 3032 | 2030 | 28.4 | 7.8 | 23.7 | 15.6 | 370 | 100% |
| 20Da | 3504 | 2336 | 27.0 | 6.4 | 22.5 | 15.0 | 338 | 91% |
| ST-8300 | 3326 | 2504 | 22.5 | 5.4 | 18.0 | 13.5 | 243 | 66% |
| D810A | 7360 | 4912 | 43.2 | 4.97 | 35.9 | 24.0 | 861.6 | 862 |
Above Updated 8/24/14 with the TOA 130 new reducer info, and July 2015 for the D810A Camera.
See also my Basic Astrophotography article at this link
Canon used to be the best brand for astrophotography (this coming from a Nikon guy). These days, if you have the $, a Nikon D810A camera especially designed for astrophotography is available..
Generally, You can start with an un-modified DSLR that will work great for
daylight and be somewhat OK on big, bright objects with your widefield scope.
You can figure out what software to use, how to guide/focus/acquire/process etc.
If it's not clear already, once you figure out how to hook up your camera to the
scope and get focus, guiding and precise focusing will be your biggest problems.
Start by taking pictures in daylight with the scope/camera, then move on to the
moon which is your most forgiving target in that it is pretty easy to focus on
it and you need very short exposures so guiding isn't a problem.
You will eventually want a way to get the camera to do multiple exposures
automatically, for longer than 30 seconds. Others have mentioned computer
programs that may assist with this; Nebulosity or ImagesPlus for example, I use
both but not to control my DSLR. I still use the "live focus" feature on my
Canon 20Da and control exposures with an intervalometer. (This means I can
shoot without being connected to a computer.) I have the Canon version (pricey
but has survived a lot of dewy nights over the years, ~$140), but I do see a
cheaper alternative that I would probably try if I were on a tight budget (make
sure it's compatible with your camera).
http://www.amazon.com/Aputure-Powershot-Compatible-Inexpensive-Intervalometer/dp/tags-on-product/B003Y35VJA
Again, big bright objects like M31, M45 and M42 are your best bets with an
un-modified DSLR. Dimmer Galaxies like M33 may also work well. However, if you
continue and try dimmer H-alpha objects you will eventually get frustrated by
the IR filter blocking all the red. At that point you can consider a modded
camera, which is your most price-effective ticket to serious deep space object
imaging.
Hope this helps!
-Dick Locke
p.s. You might wish to join the Yahoo Group "digital_astro" which
is dedicated to astrophotography with a DSLR
I did a lot of
research on guide and small imaging scope pointing options. Finally I decided
to try the Casady TGAD over a couple other options. I liked it, then decided to
go for two to simplify things in the field. (There are also several
configurations of the TGADs and figuring out the best option(s) was a bit of a
challenge.)
After all that, I realized that I couldn't take the Tandem Bar on and off the
mount without also removing one of the TGADs... So I decided to get a Casady
tip-in saddle for the AP.
I am very happy with the quality of the Casady stuff and would recommend it.
Interestingly, between the two TGADs I bought, they no longer were able to get a
part (a motorcycle master chain link, I think) that was linking the movable
plate to the bottom. They substituted another part that's a bit less
attractive, and seemed less sturdy; that kind of freaked me out. After
exchanging emails with Robin I settled down, and in practice the new part works
fine.
-Dick Locke
My heavy rig features Manfrotto 3068 video tripod legs (big, heavy, aluminum, but supports up to 40 lbs) and 501HDV Pro Video head. I will put my small telescopes (e.g., FSQ-85) or 70mm binoculars on this rig.
In 2015 I re-dedicated the 3068 to use with a Losmandy Starlapse.
My mid-weight rig has Manfrotto 3401 Aluminum tripod legs (rated to about 13 lbs) with removable center column; the column can be mounted horizontally for convenient ground-level macro work. The Manfrotto 410 Junior Geared head rides (rated to about 11 lbs) on top. This head allows very precise adjustments of camera position, but is not good for rapid movements.
A mid-weight alternative head is the Manfrotto 488RC4 Midi Ball Head with RC4 System (Quick Release). I keep this head mounted on the extra center column for quick change-outs with the 410 head.
My light-weight rig rides on Slik Pro 713 CF legs and features a min Magic Ball head from Novoflex. The Slik has developed a problem where one of the leg joints doesn't work well after 10+ years of use...
I have Manfrotto 496RC2 ballhead that I use on a Vixen Polarie tracking mount from time to time.
I acquired a used Manfrotto 190CXPRO4 carbon fiber tripod to replaced the messed-up Slik in 2015.
I have an old Gitzo G1564 monopod (heavy, metal)
Gitzo GM2541 Carbon fiber monopod - light and sweet
I have a GoldFocus mask for my little scope, and a Spike-a mask for the TOA. While it's possible to make these masks yourself, I acquired commercially available models. The GoldFocus mask comes with some software supposedly aids focusing, however I haven't had any success with the software. I'm going to try a different mask on the Baby Q.

Cloudy days are good for flower photography... Though not what I'm hoping for on my astronomy trips! This shows my Manfrotto 410 head and 3401 legs setup. In this case the center column is mounted in the vertical position. It also mounts horizontally.
Here is an interesting document with canon lens references and test results
Dick's Pix (Dick Locke's Image Page)
Copyright ©
by Dick Locke.
All Rights Reserved.
Contact and Image Use Information
What is all this? On the far left is the finder scope, with a illuminator sticking up slightly to the left. Below it you can see an illuminated reticule eyepiece. To the right of that is the Tak FS102 telescope, with a Rigel quickfinder on the top/back. To the right of that is a ST80 that I use to auto-guide the scope for photography.