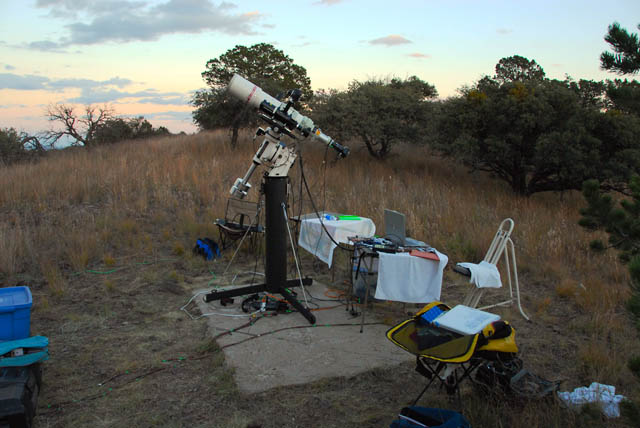
Typical 2008 Imaging Setup. Equipment Info Here.
This is an ongoing refresh of my old "film" article... I have de-emphasized the discussion of film images as essentially nobody shoots film anymore ;-)
Is the phrase "basic astrophotography" an oxymoron? Maybe. Astrophotography is a form of advanced photography. I assume you already understand basic photography for the purposes of this article. I also assume you know the basics about telescopes and mounts; i.e., you understand the differences between a refractor and an SCT, and an equatorial vs. a fork mount. If not there are many resources on the internet.
Astrophotography is an expensive and sometimes frustrating pursuit. It will require patience and a lot of time and effort. Your first results are likely to be disappointing. If you are not already a proficient photographer you will have many extra challenges. While you will be tempted to jump right into taking exposures of small deep sky objects through your telescope, that's not the best way to start. You have many skills to learn before you can do that with excellent results. If none of that deters you, read on.
The good news is that things are much easier these days than they were not too long ago. I started astrophotography circa the year 2000, back when film was king, and shot film while I was learning to produce decent astro images. I used a mount that had to be pointed manually (no "go to" function.) I often took hours worth of pictures while not being certain I was even pointing at my target! Digital cameras really help you shorten the learning curve, because you can see right away if there are any problems with your tracking, exposure settings, etc. Modern go-to mounts simplify the task of finding objects and facilitate more imaging time and less finding and centering my object time.
Here's a summary of my recommended approach to astrophotography.
The section describes the details of my recommendations and the reasoning behind them.
I started shooting film. Today's digital cameras greatly shorten the learning curve for anthropography. My digital astrophotography began with an Olympus Digicam, followed by a Nikon D100 (see D100 Images) in mid August, 2003. Even though the D100 had noise problems, it was amazing how fast it could capture photons compared with film. I began shooting with a Canon EOS 20Da, a camera designed for astrophotography, in October of 2005. The 20Da has a key modification: more permissive IR filter that passes the very common deep red light found in Nebula. Up until 2012, I sometimes used a Nikon D200 DSLR for short astronomy exposures. The D200 has far better noise characteristics than did the D100. However, in 2011 I acquired a Nikon D7000, which has quite excellent low-light and low-noise capabilities; that was my short exposure camera for a few years. In December of 2013 I acquired a full-framed Nikon D610, which surpasses the D7000 in terms of low-light and low noise performance. I still may shoot star trails with film these days, but that's about it. In late 2008 I acquired a cooled "color" CCD camera, a QHY8. Finally, in 2011 I acquired a monochrome SBIG ST-8300 Monochrome CCD Camera and filter wheel. I continue to use both CCD cameras into 2014.
I recommend you get started in astrophotography without a telescope at first. Sounds crazy, right? True, it's fairly easy to get decent shots of the moon through any telescope to which you can attach a camera. You can even have success by hand-holding a camera and shooting the moon through an eye piece. However, I assume you aspire to create images like those you can find on my web site. Many skills are needed to accomplish that; equipment alone is not enough.
I will discuss telescopes later. But, I will mention at this point that many people acquire SCT's, often with a fork mount, do some visual observing, and then want to jump into long exposure deep space astrophotography. This is a very difficult way to start. If you haven't purchased a telescope yet, read this article, note the references at the bottom, and do your research before plunking down your cash!
Let's assume you have a camera of some sort. Let's also assume the camera has the ability to perform a long exposure of between 8 and 30 seconds. If so, you're ready to get started. Go out at night, autofocus on a bright star or the moon, point your camera at a constellation you recognize, and shoot. Obviously it's best to mount your camera to a tripod, but it's possible to do this by carefully setting a camera on a surface such as a car roof or table top. Download your pictures to your computer (it's very hard to judge quality by looking at the camera's view screen) and examine your results. If you have something decent congratulations! If not, consider what's wrong with the image and read on.
If you can't already use a star chart to find constellations, bright stars, and the bright Messier objects it's time to learn. I recommend you subscribe to Sky and Telescope and Astronomy magazines. The have nice monthly star charts and they highlight interesting objects and astronomical events visible in the current month.
I recommend you start with a DSLR, which is camera with interchangeable lenses. If you haven't started yet and you don't have an investment in one particular brand of equipment I'd suggest you start with Canon. Note this is coming from a Nikon guy. (If you're starting fresh and you want to use your DSLR for daylight shots, have a look at Canon's EOS 60Da.) Here's a list of what you need:
The bad news is that astrophotography, where we image bright objects against a dark background, is just about the worst case scenario for revealing optical flaws in a lens. No lens is perfect. Inexpensive "kit" zoom lenses that came with your DSLR are not likely to yield excellent results, but they may provide acceptable results. Your best bets are high quality prime (non-zoom) lenses.
The good news is that a 50mm f1.8 lens is an excellent starting point and is likely to be affordable. While a fast (f1.2 or f1.4) lenses might seem like a good idea, it will be heavier, more expensive, harder to focus at lower fstops, and not that necessary with today's low-noise cameras.
Finally, most lenses will perform better stopped down to f4 or even f5.6, but this obviously will require longer exposure times then using the lens wide open. Fixed tripod constellation shots will likely be best wide open to minimize star trailing.
Once you have a camera/lens/tripod it's time to get some excellent constellation and planet alignment shots. Here are key considerations.
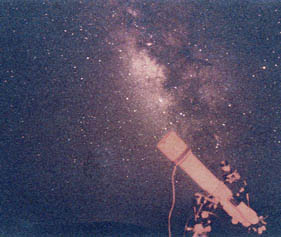
Telescope & Milky Way Film Image: fixed tripod, ~30 second exposure at f1.4, 50mm lens
For star trails, take a picture for 1 to 5 minutes to start. (Note, with a DSLR you probably won't want go more than 5 or 10 minutes depending on the camera). Shooting really long exposure star trails is still easiest with film. If all you want is star trails, you can use slow film like Velvia. Here's a 2 hr. job on 100 film; details on the page: "Sky glow" has to be accounted for in your film speed & aperture calculations. You don't need a fast lens, BTW. From suburban skies, try 5 minutes on 100 film or ISO setting at f4 as a start, and experiment. Note: It is also possible to do star trails with a DSLR, stitching together multiple short exposures. See examples of stars and planets from a tripod here. A new "Fixed Tripod Astronomy Pictures" page is here.
Meteor images can also be obtained with your fixed tripod setup. There is a very specific technique where you expose for about 5 minutes on 800 (or any fast) film or ISO setting with a normal lens at f2.8 or so. You point at the part of the sky where there's likely to be the most activity, or perhaps frame a familiar constellation as my friend did. See pix, links, discussion
Now it's time to consider jumping into a mount that tracks the sky. A German Equatorial Mount (GEM) is what you want. This is the pillar of your future astrophotography success and worthy of a significant portion of your budget.
You need a sturdy mount for the long-exposure shots which combine into the images you see on my site. My trusty Losmandy G11 mount was replaced by an Astro-Physics AP 900GTO mount several years ago. With the AP mount being several times the price of the Losmandy, I can say the Losmandy was tremendous value. But you get what you pay for: the newer mount can handle more weight, track more accurately, and hold up better in the wind. And it has "goto" object location, which is very nice and makes it much easier to find some of the dimmer objects. The mount is controlled by my astronomy software (The Sky) making it easy to precisely frame objects with the computer controlling the telescope.
While the focus of my article is a progression to prime focus astrophotography, what if you're not ready for a large, heavy GEM, but you'd like to image with camera lenses on something that tracks the sky? There are a number of interesting options available. I have a Vixen Polarie. This article covers some lower cost and lightweight options including the AstroTrac. Takahashi has a very small and portable mount Called the Teegul Sky Patrol, and it's compared to the AstroTrac in this article. The Losmandy Starlapse is another option. The Starlapse is similar to the Losmandy GM 8 which I used to own.
Question: What is a go-to mount? Answer: A go-to mount allows you to aim your telescope based on a hand controller or computer's control. If you don't have a go-to mount, you must manually locate each object you wish to view or image.
Question: What are the pros and cons of manual vs. go-to mounts? Answer: Manual mounts require you to be able to locate the objects to view or image, which facilitates your learning of the sky. With good knowledge of the sky, and an understanding of how to position the mount, hundreds of objects can be easily located in a matter of seconds. Price is where manual mounts shine; go-to features typically add more than $1K cost for mounts of imaging quality. Go-to mounts typically have access to tens of thousands of objects via the mount's brains and gears. Having gone from my manual Losmand G 11 (without the add-on go-to capabilities) to the AP 900 GTO (a go-to), my personal experience is that I love no longer needing to crawl under the camera to locate an object straight up at 3:00 a.m. and when the temperature is below freezing! Not only is goto easier on your body, but it also increases productivity under those precious and rare periods of clear skies at a dark sky location. (And you know how precious periods of good imaging are if you, like me, have a job and don't live in a desert.)
Answer: Assuming the goal is prime focus, a solid, quality mount is the number one most critical thing in asto-imaging. If the mount can't track accurately, the best camera and optics in the world will still yield poor results. Since you can't predict clear-sky conditions, you will want a mount that carries your payload in a certain amount of wind. Used "in the field" and without a dome or physical protection, your mount will may be affect by winds in the 5 mph range at longer focal lengths. My AP mount is clearly better in the wind that the G11, but any kind of gusty wind in the 10 mph range will start to degrade image quality.
Here are some other references for you while you wait:
Attach your camera and lens to your mount, focus, frame an interesting object or area of the sky, and shoot for 2 to 5 minutes at ISO 1600. You should have an interesting shot.
Prime Focus Astrophotography
Prime focus astrophotography (using a telescope such as my Takahashi TOA 130 as a camera lens) is very difficult and takes quite a while to master (except for moon shots).
Shooting the moon through a telescope is easy. You shoot with a fast enough shutter speed that it's usually not critical to track the sky. 
See example moon shots from a tripod here.
See me and my scope/mount setup here: (bottom of page) and here: Scope Setup (this shows a camera and a film lens attached to a telescope mount.) For long exposure astrophotographs a sturdy mount is in order. Here's a link with one of my better wide field shots
DSLRs are now a preferred way to take pictures of the night sky. The Canon 10D and related cameras were king of D-SLR astrophotography due to long-exposure noise characteristics. The Canon EOS 20Da became king in 2006 due to it's modified filter. There are also a few outfits that take normal cameras and modify them for astrophotography. There are still some reasons to prefer film for astrophotography, cost being a primary factor. See my discussion here: Why Film Astrophotography?
One other point is that what people do with digital cameras is to take a large number of pictures that individually are under exposed, and then digitally combine them. Combining multiple images is required to create good pix of planets.
Most astro images benefit from extensive digital image manipulation as described here Photoshop Basics
Old Film Info: Film choice here is very important, because some films are very poor performers. Now Kodak E200 slide film is the best, while for print films Fuju SHQ 200 (sold only at discount and drug stores in 2008) is the best print film.
There there are a couple of newsgroups relevant to this topic, the astro-photo@seds.org and http://groups.yahoo.com/group/digital_astro/
-Dick L.
p.s. Books: Covington's Astrophotography for the Amateur and Reeves' Wide-Field Astrophotography are indispensable. Wodaski's "New CCD Astronomy" book is also excellent.
Copyright © by Dick Locke. All Rights Reserved.
Contact and Image Use Information