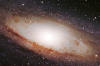
Andromeda Galaxy: Believe me, they don't start out looking this good!
Andromeda Galaxy: Believe me, they don't start out looking this good!
This page serves as my reference for Layer Blending and other Photoshop techniques to remember. I'm always looking for better ones, contact me if you have suggestions or questions. My normal Astronomy Image Processing Workflow is here.
This is the approach I take when blending in a "small" prime focus image into a larger, wide-field image.
Result of above technique: 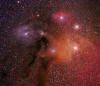 Antares and Rho Ophiuchi Area
Sometimes you want want to reduce the size and prominence of stars in astronomy images. The ImagesPlus "Star Size and Halo Reduction" feature worked pretty well on M16. Some additional links with other techniques are below. There doesn't seem to be a magic formula for star size reduction that works well for different kinds of images, you have to experiment.
Key Elements of Layer Mask Blending
This is a great technique to blend elements of any two images together where controlling the relative brightness of an an area of the image is the goal (think the core of M42 or other bright nebula, or even star sizes)
Copy an image with a more controlled bright area and paste it on top of the image with a too-bright area
Create a layer mask by clicking on the layer mask icon
Alt-click the layer mask to open up a window for the mask
Paste in one of the images you are working with, recognizing that the white/bright areas allow the top image to come through in the blend, while the dark areas will be ignored
Blur and/or use curves to manipulate the layer mask to smoothly blend the two images together
You can open one window showing the layer mask, and one showing the blended image, for reference.
Paint in a correction layer steps reference:
1. Use adjustment layer for extreme corrections
2. X to set foreground color to black
3. Make sure curves layer is clicked
4. Alt-Backspace to fill Adjustment layer's mask with black (image returns to original look, black mask hides correction)
5. X to set foreground color to white
6. Brush tool
7. Paint in correction
8. (X to make black foreground color to erase)
9. Can change layer mode if needed
Color samplers-> select (eyedropper palette)
Duplicate Layer | CTRL-J |
Merge Layers | CTRL-E |
Background Layer to Normal Layer | Double-click background layer |
Channel Blending
Get a copy of the channel you want:
Display the channel
Select All
Copy
New Document (CTRL-N)
Paste
Drop down a layer (CTRL-E)
Display only channel to change (channels palette or CTRL1 for Cyan or Red, e.g.)
Kbd shortcut ~ to show composite color while leaving pre. Channel active. CTRL~ to access other color.
Image-> Apply Image to mix in any other channel
Blending modes Normal, Darken (disallow blend if would lighten image)
Change opacity until you're happy.
Channel Blending 2
Duplicate Layer (in RGB)
Apply channel to RGB composite
Luminosity blending mode, in Layers palette
Opacity, adjust to taste if too harsh
Normal mode, -> change to Luminosity ->or Darken
Magenta between Red and Blue (redish blue) kills green
Cyan btw blue and green kills red
Yellow btw green and red kills blue
Ron Wodaski posted to following to one of the news groups describing a way to eliminate vignetting. I used this technique above. Jerry Lodrigus has documented another useful technique, but the disadvantage of Jerry's is that you never can get it exactly right throughout the whole frame. The technique below allows you to do that. From this page: Orion Area, 300mm
I've documented a simple way to created synthetic flat fields using
Photoshop in my book "The New CCD Astronomy." It works for both film and
CCD images.
The basic idea is to use an image that doesn't have extensive nebulosity in
it, and to apply Photoshop's Dust and Scratches filter with an appropriate
radius that will remove most of the stars in the image. You can use the
Clone Stamping tool to clean up any very large stars or small patches of
nebulosity that remain.
Then apply a strong Gaussian blur (usually in the range of 10-30; depends
on what's left) and you will have a very smooth and very accurate pseudo
flat-field image. The nifty part of this is that it works well for
full-color images. You can apply it in a single step by putting it in a
layer above your image, and setting the bland mode to difference. Adjust
the blending % to somewhere in the range of 80-95 (usually) to get just the
right amount of subtraction.
(DL note here: I'm wondering if the above is a mistake, as I am using more 10-15% blending than 80-95% as noted above. Please let me know if I'm missing something :-)
This methods works well for light pollution gradients, too.
Copyright © by Dick Locke. All Rights Reserved.
Contact and Image Use Information